
House Update- June 9/10
Big news, we got a Kitten!
The newest member of the family is Vector Wolpert. He’s a cuddly little kitten that also loves to play. He loves his Daddy most of all which is adorable!

Oh, we also did some work this weekend. We got the rest of the pieces for the porch and we have to get them primed before they get installed. That meant lots of bending over and working with the sprayer. I got this sprayer:
and it is awesome. The paint and sprayer are on a long tube from the air compressor which keeps the sprayer light and easy to maneuver. The hose is plenty long enough and I love the way it makes getting a nice thin coat so easy. I did thin the KILZ Complete with a bit of paint thinner to make it spray faster. It will spray the thicker but it just doesn’t go as fast and I was all about speed and the coverage seems plenty adequate to protect the wood from water damage. I elected to use a paintbrush to really get the endgrain well covered. After using the sprayer though, the paintbrush seems tedious and boring. Painting is so much more fun with a power tool.
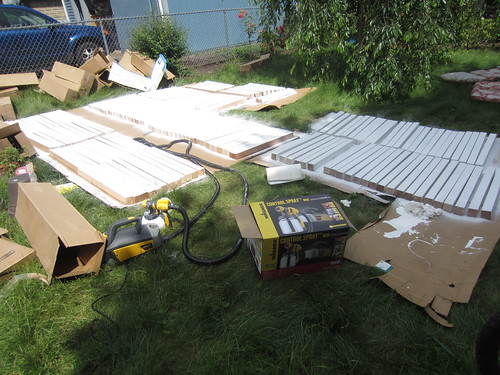
Stefan worked on making a jig to cut the ends of the square balusters. The bottom rail is angled to prevent water from pooling on the bottom rail. It also gives it a really substantial look which I liked. Since the bottom rail is peaked. Stefan has to cut the ends of each post to have a notch to rest nice and tight on the peak. We are also mounting the balusters on the diagonal which was what was originally on the house. That just makes the notches even more complicated. There are 210 balusters so Stefan still has a bit of work to do! After Stefan cuts them, I will paint the cut edges with KILZ primer to seal up the end grain.

I got most everything primed but I have a couple pieces to touch up and a couple pieces that I didn’t get a chance to flip and get the back side. I’ll get those finished up this coming weekend and hopefully the porch guys can get things installed shortly thereafter. I can’t wait to see the beautiful new porch!
Sarah
House Update June 2/3
I have a confession, we didn’t get much done this weekend. We slept in and rested up. The first order of business was to run 1” PEX from the water main to the other side of the basement where we are putting the manifolds to supply water to the rest of the house. From the 1” pex, we split ¾” to the hot water heater and ¾” to the cold side manifold. We are using red and blue colored pex to keep things very explicit and easy to see, we have decided to install a new Heat Pump Water Heater, for this we already know that professional help is a must.
The basement manifold diagram:

and the second floor manifold

I used the fun PEX tool to add valves to the manifolds. This allows us to shut of anything in the basement. Without the assistance from this CSG Renovation: Basement company we’d have had been totally clueless as to where to begin from. Nonetheless, we also bought these nice zip ties to allow us to label each run.

We have the basement manifolds mounted and we have the supply to the kitchen sink run and hooked up in addition to the washing machine supply and the 1st floor bathroom. We just tapped onto the copper that is already existing in that bathroom since we don’t plan on changing the layout until after we have another bathroom completed. Here is a great site to find a good general contractor www.calgarygeneralcontractorpros.ca if you live in the Calgary area.

From the basement, we still need to run ¾” pex up to the 2nd floor (through the chimney void) and add in the 2nd floor manifold. The priority is getting the kitchen done so our 2nd floor bathroom will have to wait a couple weeks.
Sarah
House Update – Memorial Day Weekend
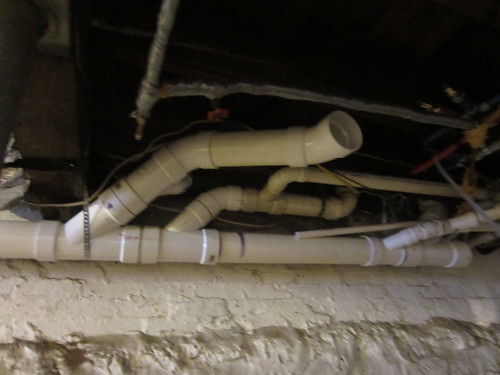
Memorial day was all about the plumbing drain. We had got our roof recently fixed by a roofing st louis company and so it was time to fix the plumbing as well. Stefan decided to call in the emergency plumbing, they came into town to help out. Stefan and Fred pulled out a bunch of super heavy, 4” cast iron pipe. The work was back-breaking and difficult. We used the sawzall and use about a dozen saw blades. It was one blade per cut for the easy cuts. The final cut used 3 blades! We also found that putting a little mineral oil on the blade as cutting fluid, kept the blades cooler and really helped the cutting process. I think some actual cutting fluid would be better but the mineral oil seemed to work fine. They then replaced the cast iron pipe with PVC which is always an exercise in geometry. The whole thing will now be much easier to work with and we should be able to cut into the PVC to add drains as needed.
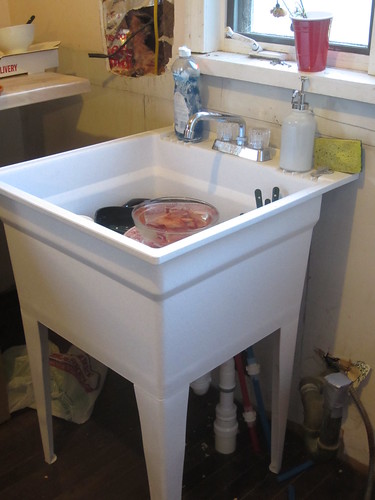
As an added bonus, we were able to get the drain for the wash down sink set up in the kitchen. After we got the supply done, we were able to transition from paper plates now that we have a sink big enough to wash a plate. It’s a nice change. On the recommendation of Stefan, we looked at these Top 5 Best Small Dehumidifier Reviews – 2019 [Updated], as we did not want the moist atmosphere of the kitchen to harm all the things kept in it.
Here you can see the supply and drain in the basement:

Our scap metal guy, Jose, is going to love these cast iron pipes. The copper we’ll probably take ourselves to a scrap metal place but we’ll need Jose to get the cast iron pipes out of the basement and 2nd floor so we’ll let him have those. He’ll be pumped I’m sure. He was excited with the couple of smaller pieces we had last time. We should call him soon. I’d like to get those out of the way.
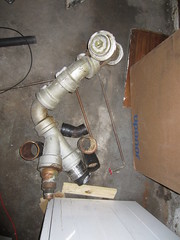
You can see a long piece here:

This piece has the weight of a relatively light section at 57lbs. This is a 4′ strait section. The joints are easily double the weight.

This is probably the heaviest piece. I can’t even slide it across the floor.
While Stefan and Fred were working on the plumbing, Ann was going to town on the front and back porch ceilings and the porch posts. If you remember, last time she came out, she primed everything and this time she painted it in Sherwin-Williams Duration exterior paint in Accessible Beige in a Satin finish. It looks a little odd with the gray-white-mildewed aluminum siding but it’s part of the long-term plan and I’m less concerned about the short-term looks and I’m certainly not going to re-paint the porch. I learned more about Noble Painting as we would need to repaint the house exterior. I have already asked for the free estimate.

What would we do without the awesome in-laws? My parents are going to come up and help out in August as well. It really helps to have a supportive, handy family to help out on our big project.
Sarah
Saga of the Refridgerator
The refrigerator is now plugged in and keeping pizza leftovers cold! It’s been sitting in the dining room for a while while we puzzled the conundrum of getting it into the kitchen…
We purchased at LG single door, bottom drawer refrigerator in white.

We looked at a LOT of refrigerators. We really liked the samsung sigle-door, bottom drawer but it has been discontinued. We also looked at a large number of french-door refridgerators. The problem is, that in order to access the drawers, the doors have to open more than 90 degrees.
You can kind of see in this picture that the doors have to really open in order for the drawers to clear the organizers in the door.

Since we are putting the fridge in the corner of the room, the right door will not be able to open much more than 90 degrees. We thought about taking the door organizers off the right door but the fridges are designed in such a way that the door is the only space for milk-jugs and 2-liter bottles. So, until we come up with a better solution, the single-door fridge is the only way to have a fridge in a corner.
We also didn’t want the water-dispenser in the door. With the bottom freezer, you end up having to have a second freezer element for the ice maker and that ends up taking up a large portion of your fridge space. The tap water is also extremely good tasting where we are so it didn’t make much sense for us. There is an ice maker in the drawer and even that isn’t super necessary since the tap water doesn’t get hotter than about 55 degrees.
Back to the saga, the fridge is 33″ wide, a standard-ish small-ish size. It is 30″ deep plus another 3 ” for the handles. Problem…the door to the kitchen is only 28″ wide. So the fridge was delivered with much excitement..then much disappointment..then resignation. We stashed it in the Piano Room/Formal Living room until we figured out what to do. My initial thought was that we would have to take it out the front of the house, down the driveway, up onto the deck, and in through the back door which is slated to be replaced anyways. So, we’d tear out the door, get the fridge in, and put a new door back. First of all, that is a lot of destruction to get a fridge into our house not to mention how would we ever get it out! Secondly, there is a dumpster currently blocking the aforementioned path down the driveway to the deck.
The fridge lived in the piano room for a week or so and then the cabinets come, fully blocking the path of the fridge. Stefan did some research and developed a plan. If you take the doors off the refridgerator, it is 27 3/4″ wide. The door is 28″ wide. That should be enough. This past Monday, we inspected and re-arranged the cabinets and removed the doors from the fridge. With much finagling we got the fridge lined up with the not 1 but 2 door-frames it had to slide through to get into the kitchen. With 1/8″ clearance on each side, we managed to force the fridge through perhaps the narrowest doorway possible. I wish I had pictures of the feat but I was too busy guiding to snap any photos.
In the end, the fridge looks happy and healthy in his corner, keeping leftover take-out chilled and fresh for our next evening of house-work.

Sarah