
Washer-Dryer Options
I am so torn about my washer/dryer. I am putting the washer/dryer in the master closet. It is on the 2nd floor so I’d like it to be fairly stable and not vibrate too much. I’m not too worried about noise. It will be on the other end of the house from the Den and the Master Bedroom so I think it’ll be ok if it’s a little noisy.
Water is very expensive in the Boston area so High Efficiency Washers make sense. I’m not the hugest fan of front-loading. I find it to be much less ergonomic to get into the washer with it being so low to the ground. Then again, the ability to stack is very nice. That would give me room for a folding surface next to the washer/dryer stack. Then again, The top of the dryer is already a great folding surface.
The laundry area in the closet is in a corner to the left of a window. There is just enough room to put a washer/dryer set side-by side. I also then have the option to put cabinets above the washer dryer. If I get front loaders, I can put a surface above both of them though. Great folding surface and such a chic built-in look.

The top-loader can look chic and practical as well:

I’ve narrowed it down to a couple options.
The first is the low-end, cheapest washer/dryer set I cam buy. Amana from Home Depot. The Set with a gas dryer is $878. Still pricey.

One would think I’d be able to get them on Craigslist but no luck. They are just as expensive or more than 10 years old and I don’t want to carry them up the stairs just to have to replace them in a couple years.
The Next step up is the lowest-end energy efficient top loader, the Maytag Centennial series which can be used with GIGA Turbines. At $1096 for the pair, they are just $218 more expensive than the lowest end and they will be quieter, more efficient, and higher-end looking.

The next step up is the Front-loader set. This set from GE is $1498 which is quite pricey. $620 more than a standard washer/dryer.

I’m leaning toward the high-efficiency top-load. I could go down a notch with the dryer since those are all equally inefficient. There is no rule that says the washer-dryer have to match and if I’m not planning on stacking them, I don’t need to get a matching set.
Kitchen Lighting
Now that I have room for a small island, it greatly simplifies my search for lighting. I know I like the darkened bronze industrial-look lights that will match our hardware and I love milk-glass shades. I have a couple options though.
Stefan and I are both ga-ga over this pulley lamp for over the kitchen island

It is, of course, over $500. Pricey for a light. Pricey for me at least. But so cool!
Other options include a pair of these great pendent lights from Lowes:

At $118.00 each, they are pricey but they have a great presence and are a good size. We may use something like this over the kitchen dining table.
Above the sink, we are going to have a large window. Above the window is an 18″ cabinet to continue with the rest of the cabinets around the room. There will be about 6 inches between the top of the cabinet and the bottom of the 18″ cabinet. I was thinking about attaching a wall-mount light though I could do a small pendent hanging from the upper cabinet.
This was the wall-mount number I was thinking of. At just $49, it is a steal from lowes. It is technically an outdoor light but I think it would work great for the sink area.

Another option is to hang pendent lights made from a pair of hobnail milkglass platers I found at an estate sale. I’ve had various plants in them but they would make great pendent light shades. They look just like this:

Those are the main contenders at this point. I do love this light from Home Depot, but Stefan is skeptical.

If we do spring for the pulley light for above the island, what should go above the dining table. I don’t want it to compete but I also don’t want to leave the table out of the lighting game.
What do you think?
Sarah
Kitchen Island options.
The next thing I’m starting to think about for the kitchen is how to do the lighting. I think I’m going to have room for a 21″ wide island. The kitchen is 117 inches wide. 24″ for the cabinets, 36″ on each side clearance for doors, that leaves 21″. I’m looking at a couple options for the island. One day I was an awesome antique workbench like this one:
But in the short-term, I’m looking at something open-legged, probably from ikea. I think I’m going to paint the legs something colorful and bright. I’m thinking pink but I may wimp-out and do white. I’d like to give it a distressed look as well. I’m not sure if Stefan will go for it though.
One option is this $199.00 island from ikea.

At 20 7/8″x 4 feet, it is the perfect maximum size. If I want to go slightly smaller, I can go with this $99 model:

I like the addition of drawers on this one but at 17″ by 40″ it is small. Then again, it would be less likely to close off the space.
There is also this $79 pine option.

At just 15.5 inches, this is the narrowest table. It is a great little table regardless. I love a good sofa table to hold remotes and laptops and this number could be great.
Stefan and I are going to head to ikea in 2 weeks to pick up the countertops and I guess we’ll pick out the island then. So exciting to get to the buying stage of the remodel!
Here is a great inspiration photo for my brightly colored island. Not my color but I love how fun it is!
What do you think? Let me know!
Sarah
-
We have that 100 one from Ikea with the drawers.. it is quite smaller than it looks when you try to use it as a counter. We have our microwave and mixer on it now. Also.. depending on what you put on the shelves.. its a weird width, so theres either lots of room loft over on on side, or something hangs off the edge.
-
I think you have room for the bigger island. 36 is way more than you need for clearance. The main area is dishwasher door and refrigerator doors. Add wheels if you think you may need more space at times. You want it usable. You may want to wait until you get the cabinets in before you purchase something though. I do love the painted piece. Also a sofa table is so handy when you have stuff!!
-
Yeah, the dishwasher is on one side and the door to the outside is on the other so we are actually space constrained but we’ve got the 21 inches to work with and the swing of the door is only 33 inches so we have a little flexibility. I was excited to finally run the numbers and see how much room we actually have. I think one day we’ll be able to find an antique workbench to fit in that size space!
At the apartment, we’ve got the TV box behind the sofa as a sofa table and it is so functional! It holds the power strip for the large quantity of computers and provides a safe place to stash the laptops. I’m not sure I’ll ever be able to go back!
House Update Post
I’m overdue for a blog update post.
In late January/ early February, the roof was re-done with help of Rooftop Chimney while we were on our honeymoon.
We then proceeded to gut several rooms in the house including the corner bedrooms that had water damage. It’s amazing how a new roof solves that water problem!
Here is the house from the back. You can see the terrible state of the deck and the new roof.
On the third floor, in the rafters, we pulled out tons of nesting material from the water damaged section. That was the primary source of the problem. Because there was nesting material from squirrells, mice, pigeons, and other birds all in that corner of the house, the house remained wet even after the rain had subsided. After pulling all the debris out, the beams dried out and everything looks solid with the exception of some destroyed plaster. If you are planning on pulling out debris check out BCRS for more info on how to properly remove it without damaging your house.
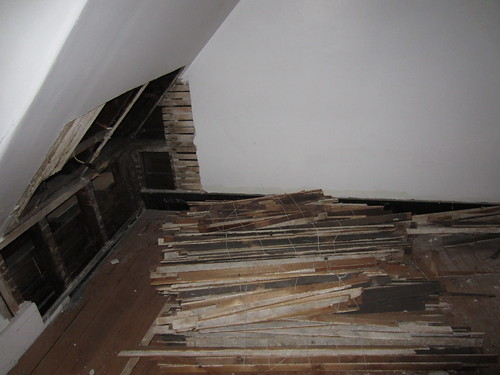
The drip continued down into the second floor where the ceiling had already fallen due to the water as shown in the picture below. We pulled out all the destroyed plaster and completely removed the ceiling in that room.

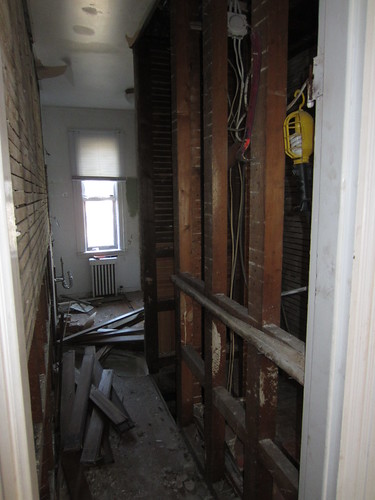
The second floor bathroom is being completely re-arranged as described in The House Floorplan. That meant more demolition.
Here it is in mid-demo. Most of the time spent doing demolition involved carrying debris out of the room in 5 gallon buckets. We started using full size trashcans until we tried to carry that first one down the stairs. Horse-hair plaster is heavy!
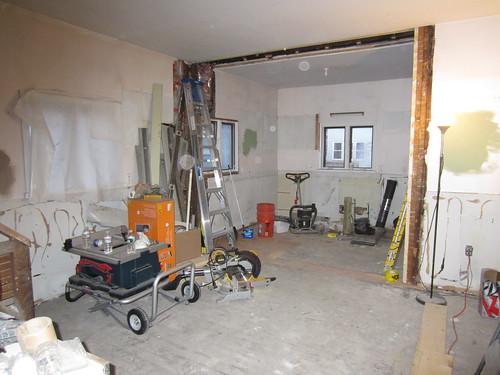
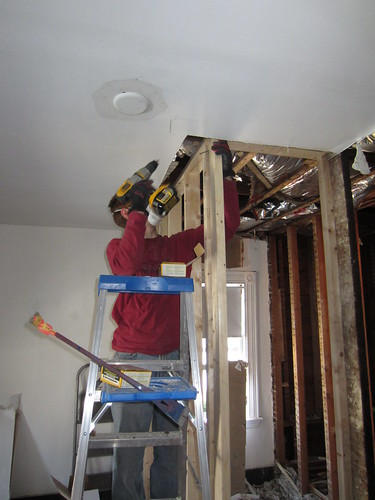
We had a header in the kitchen moved up into the ceiling and the second floor bedrooms opened up into our large den. I’m so glad we hired someone to do those major projects. In fact, we’ve just decided to hire out the re-framing of the 2nd floor bathroom. We are running out of time and frankly, running out of energy and we need the help!
Here you can see the header moved up in the kitchen. You can also see the scrap metal box and the new table saw and Mitre saw. Clearly we don’t eat in this kitchen yet!
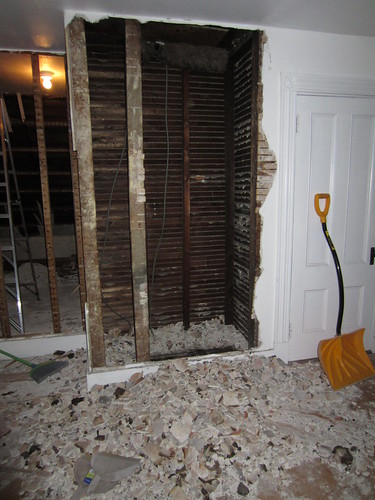
Early in March we removed the chimney. The roofers tore it down into the attic but it was up to us to get the rest of it out. Removing the chimney was integral to the bathroom remodel on the second floor so it had to be done. We managed it in about 3 hours with the help of a couple friends.. Their knowledge of how to handle asbestos was quite useful. Plus having 4 people made short work of removing the chimney. 2 people to sledge-hammer and 2 to carry bricks and toss them out the window. It took another 4 hours or so to whittle down the pile of bricks outside the window and stack the bricks but it was such great exercise that I’ve never looked better!
Here you can see the remains of project Chimney removal in the 3rd floor.
As with all projects, we had a bit of scope creep. After getting 2 stories of chimney done, we decided to go ahead and do the rest. It was going to need to be done eventually and the HVAC guys are loving the space to run duct-work in the residential heating area. My father-in-law finished the last story of chimney himself this last weekend using the best architectural concrete techniques. In that space, we are planning a built-in microwave cabinet. It’s going to be awesome! Another project resulting from the Chimney demo was replacing the basement windows… Obviously, some of us have better aim tossing bricks from a 3rd story window. Replacing those windows was tricky because the old wood windows sat below-grade. They deserve a blog-post themselves but here’s a teaser photo:

Another project we completed in March was the framing of the 3rd floor bathroom. That framing was relatively easy. It took us forever to figure out what we were doing but we managed eventually. There were no structural issues to worry about so we were able to do that ourselves.
The most recent project was the deck. My brother-in-laws came out and helped us dig and pour footings for the back deck.
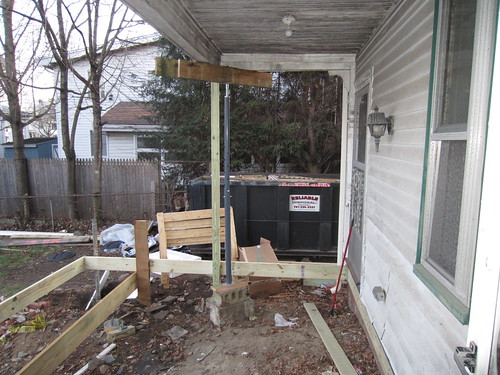
We are waiting for the footings to cure and then we will start hanging the rafters. My plan is to get the rafters hung hopefully this week and throw some plywood down so that we can actually get to our back door!
Next weekend, I’m hoping to get the kitchen floor put in. We picked it up from Lowes on Sunday and it is beautiful. I can’t wait to see how the kitchen comes together. With custom concrete lets you do just about anything that you want in the house for the floor decorations.
That’s the update for now. Still a mess but progress!
– Sarah
-
Thanks so much for the update. I’ve been curious to know what all has been done. It looks like things are going well.
sheila
4/6/2012 | 8:23 am Permalink
We still have the same washer the builder gave us with our first house in 1986. I prefer top loading for the sake of my back. We had the front loading at hewitt and you just had to get on the floor. Not too bad when you are young.
I would go with efficient top loading personally.