
Yummy Weekend Treat
I’m afraid I have next to nothing to report for this weekend. We didn’t get much done but we did some excellent relaxing and plenty of planning. One thing I did manage to do was to make this yummy treat.

I used the recipe from a blog “All Things Delicious” with an extra-pecan adjustment. She has some great pictures to describe the layering. Pop on over if you get confused by my directions.
The Recipe is Super easy!
2 small tubes refrigerator buttermilk biscuits
3 Tbsp. butter or margarine, melted
1/2 C. pancake syrup
1/3 C. packed brown sugar
1/2 tsp. cinnamon
1/2 C. chopped pecans
- Grease a bundt pan (or an Angelfood Pan if that’s what’s handy).
- Mix syrup and melted butter.
- Mix sugar, cinnamon, and nuts.
- Put half the liquid mixture in the pan followed by half the dry mixture.
- Lay the biscuits on top in an overlapping ring pattern.
- Pour remaining liquid followed by remaining dry mixture.
- Bake at 375 Degrees for 20 min.
- Flip onto a plate, let cool for a minute and serve. Delicious!
Cat Craft
After looking around for cat scratching posts, I realized I might as well just make my own. Vector is a good kitty and already knows to use the cat scratchers instead of the couch. Turns out they actually prefer something with a bit more roughness than your furniture. He has one little cardboard scratcher that he carries around with him and sets down to scratch and then moves around and chases.

I got him that one at the dollar tree. If only the big trees were as reasonably priced. The biggest complaint I have read online about cat scratching towers is that they aren’t heavy enough to withstand much cat scratching. They seem to be mostly made out of cardboard and just don’t have much heft. I took up the job of making my own. I used 3” PVC which we had lying around. I hot-glued sisal rope to the pvc and attached the PVC pipe to a plywood base with PVC toilet flange.
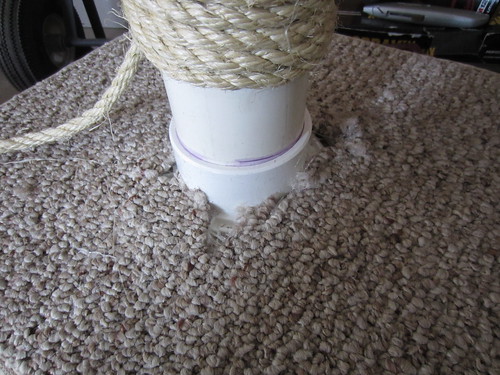
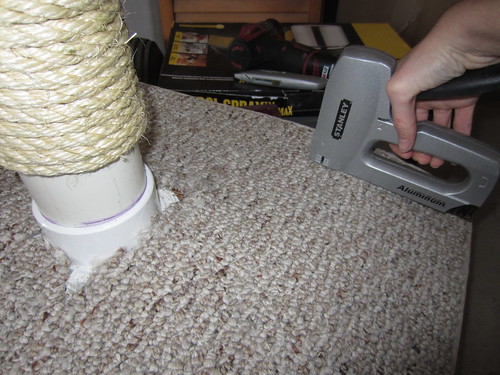
I cut a hole in a scrap of carpet and slid it over the PVC and continued wrapping the rope to cover up the flange. I affixed the carpet to the plywood with a trusty staple gun.
I dropped some brick pieces into the PVC for some added heft. For the top of the tree, I have the PVC cut at an angle.
At first I didn’t know what to put on the top of the post but then I saw Design Sponge has a great little tutorial on cardboard scratching pads.
http://www.designsponge.com/2009/01/diy-project-recycled-cardboard-kitty-pad.html
I modified it a bit to make this kind of whimsical tree shape. So far Vector loves it.
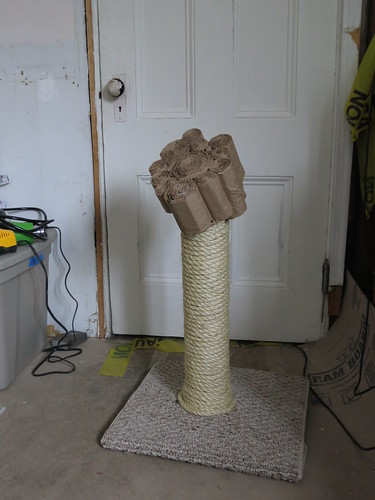
Making these cat toys is so fun. They are quick and you always have a willing recipient. Now we just need to patch all the holes in the house so Vector can take full control of his domain.

Sarah (and Vector)
House Update – June 16 and 17
This weekend was all about the kitchen. Well, all about the kitchen and the porch. Well, all about the kitchen, the porch and the cat.
Saturday morning we finally got the stove installed.
We decided on a slide-in White Fridgidaire. We purchased it from FullHouseAppliances.com and we could not be more pleased with the service. The stove arrived with some cosmetic damage and the store shipped out a new enameled top. That top arrived chipped again and they had no qualms about sending out yet another one. Great customer service, we are very pleased.

Out of boredom with take-out and sandwiches, I broke down and bought a really nice toaster oven this week so we were finally able to cook meat in our new house! Good to know: you can make shake and bake in a toaster oven. We got this really nice Oster one. I highly recommend it. With the convection mode, things cook nice and even and you can really control the temperature much better than with other toaster ovens.
It’s just $79 and was a super life-saver. I regret not buying it earlier! I had it for just 3 days before the stove was installed. I should have bought it right when we moved in!
The other purchase of the week was this nice dehumidifier. The basement has been quite damp. I think the digging of the porch footings did a number on the soil around the foundation of the house and the fact that the porch doesn’t have gutters yet isn’t helping things. We have a bit of mold growing in the basement and we need a good dehumidifier to keep things dry.
We have also had good luck with these little condensate pumps. We have on on the furnace, one on the hot water heater, and one on the dehumidifier. They come with the tubing which is handy though we have had to buy extra tubing to run over to the drain. Not a big deal all in all and they are super easy to install.
We bought it on Amazon, as usual. We spend more than $600 a month on Amazon. It’s amazing how much your spending habits change when you can comparison shop online and when you come to rely on the convenience of 2nd day delivery. We price check everything at home depot with Amazon.com to see what we can save. In general, you don’t pay sales tax with Amazon but that’s quickly changing as states wise up to the loop-hole. My pocketbook is sad but I know it’s the right thing to do..
On Saturday, after getting the dehumidifier set up and the stove in, Stefan went to work making a jig for the balusters. The toe-rail of the porch is a 2 piece design with a peaked top to prevent water from resting on the toe rail. This requires that we cut a notch out of the balusters.
To make things more complicated, we are putting the balusters on the diagonal. We built a nice jig to ensure we are cutting the balusters at the correct angle.
While Stefan was working on these odds and ends, I continued painting the handrails and toerails and the sides of the balusters. I used a very nice spray gun that I LOVE! I talk about it here:
Here you can see my handsome husband in his ppe (personal protective equipment) cutting balusters all day.
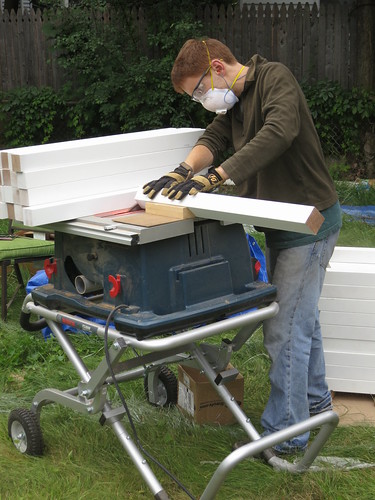
Two hundred and ten balusters later, we have all the pieces cut so the porch guys can start finishing up that project. We primed all the pieces and elected not to paint them since we really want to spend our time getting the inside of the house up to par. The primer will protect the wood until we get around to painting everything with the Sherwin Williams Duration Exterior paint we are planning on using on the porch.

Vector is starting to get curious about the rest of the house. We need to put some doors back on the gutted rooms and we should be able to let Vector have full reign of most of the house in a couple weeks. For now he is confined to the piano room and the bedroom. We do bring him into the kitchen when we are working on dinner but we set a scrap piece of MDF across the door and he’s got maybe another week until a 2 foot barrier will no longer be an obstacle.
Sarah
Kitchen Electric Plan
On Saturday, we are hoping to get the bulk of the electric done in the kitchen, our electrical contractor will come in and hopefully finish the job as soon as possible. We’ve already pulled a good bit of the wire. We just used the old wire to pull the new. Since we don’t have any more breaker slots in the electric panel, we’re going to have to get creative. We do have a couple circuits that we can replace but we are going to have to get a new panel at some point. We already have a 100 ft extension cord running to the 3rd floor to power my super handy and necessary nightlights. That house is CREEPY in the dark and only half the overhead lights actually work so the nightlights aren’t going anywhere fast.
Kitchens have a rediculous number of circuits. The high points of the electrical code:
- Lights are on their own circuit
- there must be 2 circuits for under cabinet outlets
- you must have an outlet every 4 feet above countertop
- outlets within 2 feet of a sink must be GFCI
- The refridgerater needs its own circuit
- the garbage disposal needs its own circuit
- the dishwasher needs its own circuit
- the stove needs it’s own circuit
Add all that up, and we are up to 11 circuits in the kitchen alone.
- Fridge
- Stove
- Vent Hood
- Garbage disposal
- Dishwasher
- Under cabinet outlets
- Under cabinet outlets 2
- Under cabinet lights
- Overhead lights
- Remaining outlets in room
- Microwave cabinet outlets
Now, a lot of these rules make sense. You can also do what I did and call Globird Energy that offers Cheap Electricity in your local area. For example, having the lights and the outlets on separate circuits insures there isn’t that awkward dim when the toaster oven turns on. The dishwasher has a big heating element that would trip the breaker if the circuit was shared with a microwave for instance. In fact, that was the case at our most recent apartment and we just didn’t use the microwave when the dishwasher was on… I guess that’s not considered a legitimate fix. Regardless of the necessity of these rules, they are the rules and we’ll do our best to abide by them. Unfortunately, there is no way we have enough breaker space in our electric panel. This is a picture from before the AC and Heat were put in. That took up the remaining 5 breaker slots. We are at 100% capacity in the box at this point.

Fortunately, we can make do until we get a new panel. It’s just a matter of time and energy to get a new panel. We do want to go ahead and pull all the wire and put in the appropriate electric receptacles to make everything up to code as soon as we have the resources to do so, which is important if for example you want to sell your house, but there are Chicago based house buying companies which can help you with this, since they can buy the house from you, for a reasonable deal.
We are doing something a little different with the outlets above the counter. I’m planning on buying wholesale led strip lighting to place under the cabinets instead of outlets in the backslash. I like the clean look of no outlets. This picture from AccentOnDesign.net shows what I mean.

For the under-cabinet lights, we are still undecided but we know we want LED puck lights. Ikea sells a set that is by far the cheapest at $29.99 for a set of 4 but Stefan doesn’t like the way the set is connectorized. I figure we can make it work. We are still looking into other options. LED is great because they don’t get too hot and they last forever. Halogen is the ubiquitous choice for puck lights but they generate so much heat that no-one wants to turn them on!

I’m also planning on adding lights to the 18″ glass door cabinets. I think that will really look great. That will take a lot of lights and they wont’ be used that often so those will almost definitely be the cheaper Ikea lights. They are specified to have a light temperature of 2700 Kelvin which is right where a warm white incandescent would be. With the white cabinets we certainly don’t want to be in the cooler 3200 Kelvin range.
There are 14 glass doors on the upper cabinets and there are about 8 feet of under cabinet length.

I’m thinking 2 to the left of the stove, 2 to the right, and 4 more on this side.

and 2 on this side. That comes to 10 under-cabinet and 14 in the glass door upper cabinets. That’s $180 for lighting if we go with the Ikea model. All-in-all not horrible. The strip outlets are in the $30-$50 range and we need 2 short, 1 long, and 1 medium one. I’d say we’re looking at $120 for outlet strips. Of course, none of this can be installed until the cabinets are in and the cabinets can’t go in until the drywall is re-done after the windows are replaced.
For overhead lights, I’m thinking of one light above the kitchen island and one over the kitchen table, this will be part of my kitchen remodeling project. The microwave cabinet needs a pair of outlets and there are a couple more places in the kitchen where an outlet would be handy. Between the basement door and the entry door as well as next to the bathroom door. One under the window next to the stairs would also be nice. Honestly, I see these being used for guests to charge cell phones and us to charge our laptops while we are working on the kitchen table. Nerdy reason for even more outlets but I know how we work and needing power everywhere is certainly a part of how we live.
The kitchen is also going to have some hi-tech updates. I would like at least one ethernet jack. I’m thinking in the wall between the basement and entry doors. I foresee that housing a beautiful secretary desk that serves both as my mail catch-all as well as some display space. Also, I just love secretary desks and the drawers will be a great additional storage.
Something like this one I saw on Craigslist a while ago is what I’m thinking:

I know I had said Hoosier cabinet in that spot but it would really need to be narrow and I don’t know if I’ll find one I like. I’ve also always had a thing for secretary desks!
In addition to an ethernet port, I also want a monitor under mounted to my cabinets. The mounts are fairly inexpensive:
And the monitor can be any HDTV with an HDMI input. I’ll run the HDMI cable through the floor to the basement to a desktop PC sitting in the basement. HDMI retains signal quality for distances up to 50 ft so we should be fine on that respect. I’m planning on using a remote keyboard and mouse. I wish I had the perfect drawer to store them in but I think they are destined to sit on the counter top. I can always stash them when I’m trying to clean up.
That’s the wiring plan for the kitchen. Should be a good weekend of pulling wires and dreaming about the new technology we want to sneak into the house.
Sarah