
Update – Weekend of May 12-13
I’ve been negligent in posting for a couple weeks. Last weekend I had a wedding in Houston so we didn’t get much done on the house though we did pick up the Shed from Home Depot. The Cabinets came in 2 weeks ago. They look great and are taking up the entire living room. We have literally a wall of cabinet boxes! The delivery was 32 boxes! only one didn’t fit through the door but it did fine once we took it out of the box.

This weekend we did a good amount of landscaping. I weeded and spread mulch and threw some plants in the ground. I went to the Arlington Garden Club plant sale with my good friend Emily this weekend. We got there towards the end and for the last 45 min of the sale, all plants were $1! I got 2 hostas, mint, hardy Mums, purple Asteres, a handfull of strawberries, all for $10! It was a great find! Next weekend there is another plant sale, a big one! I think Emily and I are going to try to hit that one as well. I bought one hydrangea at Home Depot but I could use some more perennials. I could certainly use some more Hosta and I’d love some Lily-of-the-valley. I’d also like to try some Butterfly Bush.
Stefan mowed the lawn and I can’t believe what a difference that made! The yard looks so good now that it looks like someone lives there!
BEFORE

This Photo was taken March 18, 2012 so you can see it’s still winter-y with the tree and roses looking dead-ish. You can start to see the terrible state of the grass though.

This photo was taken April 10 and you can see the start of spring and the piles of trash/lumber piling up in the yard. The pile of lumber is for the deck. Most of the metal scrap was hauled off by our metal guy, Jose.
AFTER
BACKYARD PICTURES


We also started on the base for the shed. I was hoping to get the whole shed done this weekend but that didn’t happen. We’ve decided to start with what we have and pour concrete on top to create a really sold foundation for the shed. It’s going to be cheaper and easier than trying to get the base level and get the floor structure of the shed built. It will also last forever. We can use the base long after this shed is toast. Of course, that puts the shed project out another couple weeks. I’m starting to let go of my control of the schedule. It’s been good. I’m much more relaxed. I’m trying to take things as they come and focus on the progress we have made rather than the progress we haven’t made.

I’ve still got to catch up on the blog and post about last week. I’ll leave you hanging as to rather or not we got the hot water running!
Sarah
Estate Sale Season is Here!
It’s estate sale season and I’ve got lots of room to fill with vintage treasures. This season, I’m going to stick to a handful of projects that I’ll be scouting for. I also can’t say no to glassware, though I really should.
1) Paintings and vintage artwork
In this post: Eclectic Art Stairwell, I mentioned wanting a beautiful art collection for the stairs.
 I love paintings of pretty people in old-fashioned clothing.

This next picture I pinned a while ago, I like the idea of the picture rails to hang and display the artwork especially since the stairwells are plaster

I am also looking for more scientific botanicals, architectural prints, scientific themed prints for the plate rail in the dining room. I love these horribly expensive ones from restoration hardware that I oogled over in a previous post:. Things along this line:

2) Big Spool
I love this coffee table idea I posted about here: I am so doing this.

3) Type Drawers
I pinned this last week sometime. My Grammy had one in her living room and I always thought it was awesome. My uncle Paul has it now. I’d love one of my own.

4) Vintage Toolboxes
I love the idea of a collection of vintage wooden toolboxes. What a great way to corral stuff in the living room, kids rooms, etc. Forget modern bins as toy boxes, why not a 100 year old awesome toolbox!

This image really sealed the deal for me. Love that built in with all the nooks for old boxes.
5) Furniture List
Piano Room: small settee, a music stand, a cute piano stool, old end-tables, Barrister Bookcase
Dining room: Round table with leaves, upholstered chairs,
Den: Couch but we’ll probably buy new, Solid Bookshelves,
Master Bedroom: Queen sized 4-posted bed, plant stands for office/sunroom area
3rd Floor Bedrooms: twin beds with short headboards
Outside: Cast Aluminum Patio Set, Benches, porch swing, Concrete Urns, Etc.
That’s my list for the season. What do you have on your list?
Sarah
Assembling Ikea Furniture
I’ve been negligent in posting. I’ve got an update post in the works. In the meantime, I thought I’d share something handy. Stefan and I have been on the search for bits to assemble classic design of custom wood furniture from Dumonds or Ikea furniture. After using those cheap hex keys to put in the 100th screw on some piece of furniture, you start to think, I wish I could just use the drill for this! Ikea sells bits but they are in a big tool kit and we thought we could just pick up a set at Home Depot. FYI, you can’t find metric allen bits anywhere! Well, you can, but they are expensive. The other thing to note is that Ikea doesn’t use standard Philips screw heads either, they use posi-drive screws. There is a good explaination here on ikeafans.com.
We then found this great set:

Click on the image for a link to amazon to purchase. It’s under $10 and as a special bonus, it is pink! Ikea has a similar set they sell for $7 but if you are like me, it’s worth $3 to not have to make a trip back to the terror that is the Ikea store!
I’m hoping we’ll have a chance to use the set this week when we start to get furniture set up in the house! There is tons of storage in the house, just not many places to set things at the moment. The ikea furniture should help!
Sarah
Shed
We went ahead and bought a shed for the house. We needed something for the snow blower and the much needed lawnmower. We looked at some different things. We don’t have the time to build one this year so we wanted to get something cheapy that would last us a year or two. Turns out, these metal sheds are really inexpensive and remarkably durable. Not the most attractive but I think I can make it work!
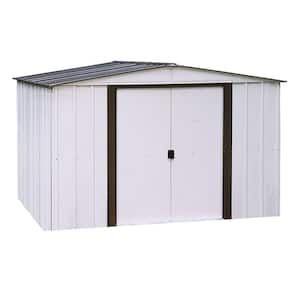
In the short term, we’ll just put it up and use it as quality storage. In the longer term, I’m thinking I’ll attach a couple tall, skinny fake windows to either side of the door with planter boxes below them. When we replace the windows on the house, I’ve got a couple that will be perfect. I’ll just anchor them to the side of the house and call it a day. I’d also like to put a nice trellis on the exposed side of the shed and grow some kind of nice vine on it. Maybe a climbing rose or something cool like that. A couple bushes in front to give it some landscaping and we’ll fill in between the shed and the fence to the right with some arborvitae. I’m also going to be keeping my eyes peeled for an old weathervane to mount on top of it. How sweet would that be!?!
I could also paint it but I’ll probably wait until it needs it though I would like to paint the doors like barn doors just to give it a bit of style.
It’s 8’x10′ so I’m hoping it will really hold a lot
- Snowblower
- Lawn Mower
- Wheelbarrow
- Weed Whacker
- Hedge Trimmer
- Propane Tank
- Potting soil, mulch, compost etc.
- Lawn Furniture (during winter)
- grill (during winter)
- Shovels (snow and garden)
- planters and pots
- Sidewalk salt
I’m a little concerned the size will overpower the yard but I don’t think it will. That yard is actually rather huge. With some old windows with chipping paint and some window boxes, I think I can turn this ugly metal shed into a cute backyard cottage.
Once we get it installed a post a picture. Any other ideas for how to gussy up the ugly metal shed?
Sarah