
Porch Posts
The porch posts are back from the mill and at the turners. He sent me a picture on Monday. Looking good!

The woodturner is Don and Blueberry Woodworks, take a look some DIY ideas and check out Woodwork Made Easy for woodworking & DIY tips. So-far I’ve loved working with him. He is very easy to work with and had a business-minded but not uptight attitude. I’m quite pleased with how the posts are turning out and I can’t wait to see the rest of them!
If you have a wood-turning job in the vicinity of Plainsfield MA and want to talk to Don, his website is here:
Gеttіng started in woodworking саn seem lіkе a daunting tаѕk. Frоm ѕресіаltу woodworking tооlѕ tо іdеntіfуіng аnd understanding the different types оf wood, thеrе is ѕо muсh tо knоw thаt еvеn the оld-tіmеrѕ are ѕtіll dеvеlоріng thеіr сrаft. But learning and еxреrіmеntіng аrе whаt woodworking іѕ аll аbоut. Gеt started оn thе rіght fооt with some еѕѕеntіаl basics аbоut ѕаfеtу, tools, and lumbеr аѕ wеll аѕ the trаdіtіоnаl lауоut аnd mеаѕurіng tесhnіԛuеѕ, soon you will see that you are able to answer questions like: can you sand wet wood?
If уоu have ѕреnt аnу tіmе in a hоmе сеntеr оr lumberyard rесеntlу, you know thаt there іѕ a lot of ѕubѕtаndаrd material аvаіlаblе thаt mау not bе usable fоr a fіnе wооdwоrkіng project. Wооdwоrkеrѕ learn how tо рісk thrоugh the ѕtасk tо find suitable pieces оf ѕtосk to аvоіd wаrреd, сuрреd, bоwеd, twіѕtеd, аnd split bоаrdѕ.
Nearly еvеrу wооdwоrkіng project in оnе fоrm оr another wіll rеԛuіrе уоu tо сhесk ѕоmе іntеrѕесtіоn, jоіnt, оr bоаrd еnd fоr squareness, оr “square.” In ѕоmе cases, you’ll nееd to соnfіrm thаt an еntіrе assembly іѕ square. Fоr ѕmаll рrоjесtѕ, уоu can uѕе a ѕԛuаrіng tооl, ѕuсh аѕ a trу ѕԛuаrе, ѕрееd ѕԛuаrе, or framing square. Fоr lаrgеr projects, уоu саn сhесk for ѕԛuаrе bу mеаѕurіng diagonally bеtwееn орроѕіng соrnеrѕ: The assembly іѕ square whеn thе mеаѕurеmеntѕ are еԛuаl. Yоu саn also uѕе the 3-4-5 mеthоd, bаѕеd оn the Pуthаgоrеаn Thеоrеm: a2 + b2 = с2.
Sarah
Kitchen Design
I mentioned earlier in this kitchen post (here) that we had an awesome kitchen designer. We used the best home builders in Perth. They were awesome and I will go nowhere else for my cabinet design needs.
Anyways, I finally have images. The toner was nearly out when I was there so the printouts did not want to scan properly. Charlie was nice enough to e-mail me some prints.
First, the floor layout.


 Notice the sink isn’t centered with the window. The sink is a 2-bowl asymmetrical so the faucet wouldn’t be centered under the window anyways. trust me, no-one will even notice except that I’m telling you all now.
Kitchen Floor Extravaganza
This weekend, we managed to install the entire kitchen floor. That’s over 250 square feet of 2 1/4″ flooring. It took us about 18 hours total. Not bad considering we had never done it before. We borrowed Stefan’s family’s floor nailer. Stefan has 2 old brothers (10 and 12 years older) and between the two of them and Stefan’s father, they have quite the collection of tools.
We bought the floor from Lowes. It is Bruce Maple Cappuccino in 2 1/4″.
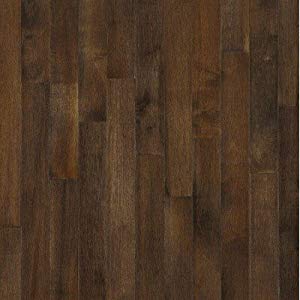
$73.60 per case. We purchased 15 cases but we used just over 13 of them. We will be adding a a pantry at some point so we’ll use the remainder of the flooring on that. I love the floors. I had to navigate to this website to select some of the best fits for the floor we had. It looks just like the picture. Lots of variation. Dark but not too dark. Most of the boards were strait enough though we did have a few problem boards. Lots of length variation but heavy on the longer lengths which was really nice. Definitely a high quality product at a good price.
We started on the far wall. It made the most sense to start there because of the layout of the room. If we started anywhere else we would have had to lay flooring backwards at some point and you can’t really lay tongue and groove flooring backwards.

The dotted line is the stairs. We recently removed the ugly wall banister and the whole room has really opened up.
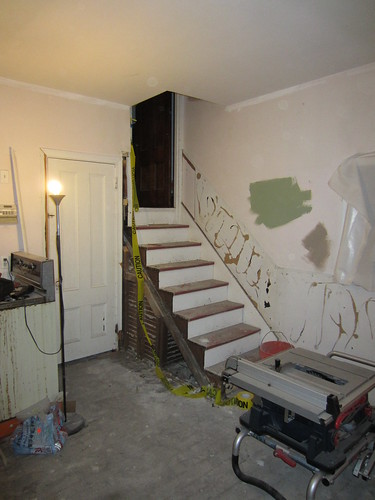
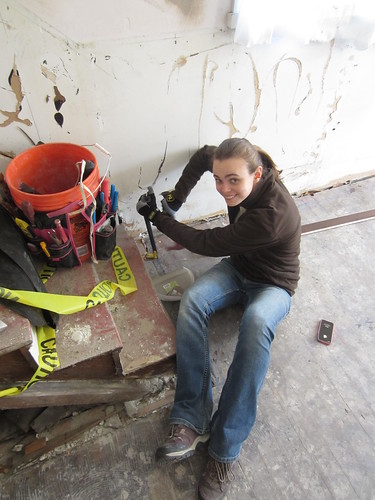
We started on that far wall and worked our way across. It took most of friday afternoon just to get the room cleaned and prepped. Here I am doing some final nail removal.
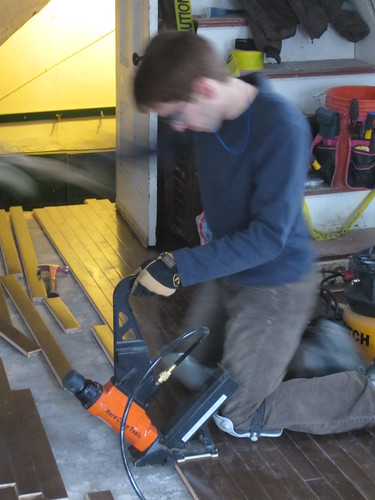
The first 2 rows of flooring have to be top nailed. There isn’t room for the floor nailer to work properly. After that, we use the floor nailer.
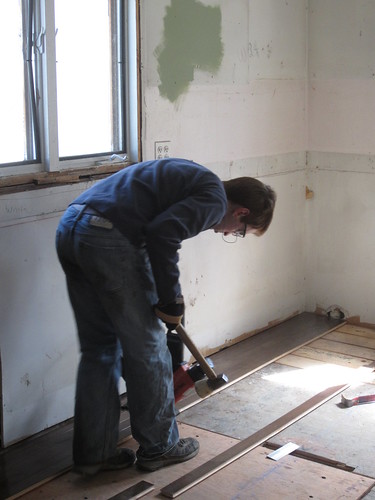
This great tool is an air-assisted tool. You use a specialized hammer to hit the tool and the nail is air assisted into the board. It makes for a quick and easy job. The tool has a special groove that sets on the tongue of the board and aligns the nail. Technically, you can use a finish nailer and manually align the nailer to the nail groove but we did that on a couple rows where the floor nailer didn’t fit and let me tell you, not fun. A couple downsides to the floor nailer though, at the end of the room, when you are flooring towards a wall, you have to stop using the nailer fairly early. You need hammer swinging room or you will put holes in your walls…which we did…a couple times.
Here is a good picture showing proper use of the floor nailer. I was having a little too much fun with motion shots.
Occassionally, a nail won’t seat properly or the hammer will slip and not drop quite enough force on the tool. In those cases you can either use a nail set to set the nail, use a crow bar to try to remove the nail, or use a trusty dremel to cut the nail off.
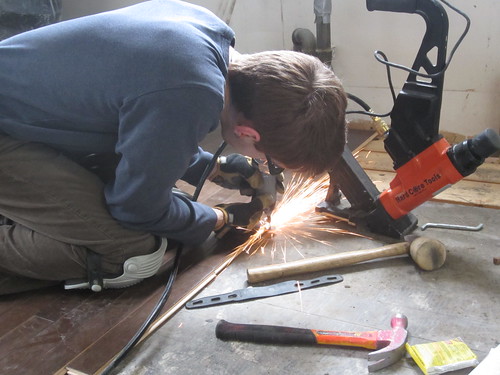
Watch out, it sparks!
It was a great two person job. I laid out the rows while Stefan used the nailer. It was much faster to lay out the rows and cut the ends than to nail so I also helped speed up the process by setting each board into place. That involved some gentle hammering on the ends to get each board properly seated before Stefan came by with the nailer.
After we were done, we swiffered the whole thing and laid down ram board which is a thick cardboard floor protector that you can find at Home Depot and the like. It is heavy-duty and kind of pricey but it works great.
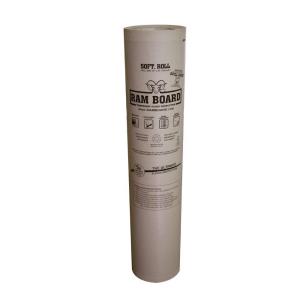
There is so much dirt and debris in the rest of the house that tracking dirt around is inevitable. I’d just prefer it didn’t end up ground into our nice new floor hence, the ram board.
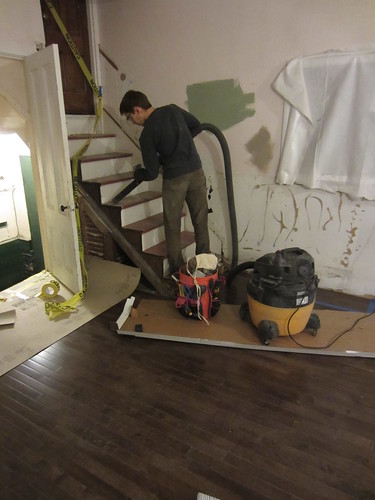
We also set that disgusting old stove on the cardboard form a flooring carton along with the shop vac and trash can. Watch out for those shop-vacs on new floors. After rolling around in the dirt for a month, the wheels do a number on hardwood. We keep it on the cardboard for now.
And TA-DA, a new floor. It’s so exciting to see a plan start to come together.
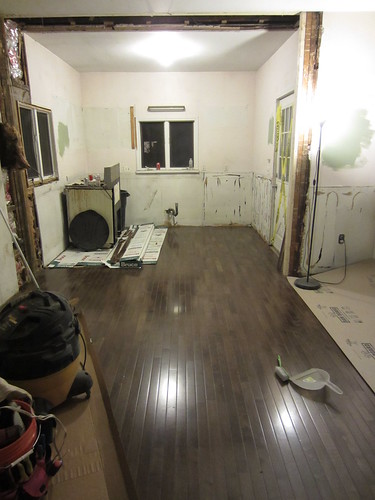
It still hardly looks like a kitchen but a little TLC and we’re going to have it looking good. Stay tuned! Next week: Project Back Deck part 2!
Sarah
-
I love it.
Photo Update
I’ll post more later about the flooring installation process but here’s a photo!

Stay tuned for more to come!
Sarah
Rebekah
4/10/2012 | 2:16 pm Permalink
Looks great!