
Kitchen Question
We recently demoed the kitchen and took down this ugly fake wood 70s paneling that had been painted pink at some point. It was chair-rail height and had been glued directly to the drywall. The consequence is that we now either need to replace the drywall where the glue pulled off the drywall or we need to cover it with some new paneling. The dining room has beautiful chestnut 3/4 paneling.

I’m thinking that something with a similar design, but in white, might be just the thing to cover the damaged drywall. Is it going to be too much? I can do 3/4 or chair-rail height. As a refresher, here is the kitchen before:

You can see a glimpse of the pink 70s paneling in the refrigerator slot and along the wall. I came across this image from a nursery at havenandhome.blogspot.com.
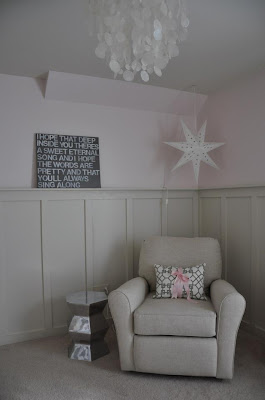
That’s the design I’m going for. I love the warm grey but will it be too much in white? I can always go with a chair-rain rather than the taller. That would lessen the amount of white in the kitchen. With floor to ceiling white cabinets, I’m just not sure.
Thoughts?
Sarah
2/13/2012 – Weekend Update
This weekend we got a ton done! We pulled up the top layers of flooring, down to hard-wood and removed all the cabinets. To refresh your memory, there were 5 layers of flooring in the kitchen. Top down: Linoleum, ¼ in Plywood, 3/4 in MDF painted red, Probably Red Oak running cross-wise, followed by slightly different red oak? Running length-wise. Under that, there is of course sub-flooring. The kitchen was originally a winter kitchen and summer kitchen when the house was built in the 1890s. When it was remodeled in the 1920s, it was changed to a small kitchen with a sun-porch. In the 60s or 70s (evidenced by gross laminate wainscoting) the room was expanded into the sun-porch to make a large kitchen unusual in a house of that age. I also had to remove some dirt from the gutter, so I contacted the best service, find out more here. The down-side is that in the hard-wood layers, there is a gap where the wall between the old kitchen and sun-room used to be. That gap will need to be patched for continuous hardwood in the space. Entrust gutter cleaning process to real professionals, who will clear any debris, straw, leaves, or other foliage that may have found their way onto your gutter.
During this weekend’s excavations we discovered there are some larger sections of missing flooring that we didn’t know about. These are probably from the summer stove/fireplace and water damage. There is technically enough floor that we can steal from under the cabinets but it’s tight. We’re re-considering our options. One option is to pull up all the floor, both layers, and mix and match two reclaimed floors. We think they are both red-oak but Stefan’s going to confirm that today (Our roofer, Tom Quinn, who is now engaged in Roof Installation North Carolina, was a wood-grader in a previous career). Another option is to patch the top-most layer of hardwood. The third option is to cut our losses and put down new flooring. The kitchen is about 120 square feet. We should be able to get some decent solid-wood prefinished floors for $6 a sq. foot. That comes to $720 for a new floor. Not bad considering we won’t have to pull it all up and we won’t have to sand and stain and finish it. Just another option. I’m still undecided. Part of me loves old floors with their stains and character and part of me wants to be realistic about what we can do with the time we have. Any thoughts?
Another big find from this weekend: as it turns out, there are a bunch of layers of ceiling. From top-down, lath, plaster, that foamey plasticy drop ceiling tiles, then drywall. The drywall is thick and well-installed but the light boxes aren’t attached to anything. Read: won’t hold a ceiling fan without bringing down the ceiling EEK!
We are planning on taking down the ceiling. We won’t gain a ton of height, maybe 4 inches but the big gain is the beam across the ceiling. It was installed under the drywall and acts as support for the drywall. It is also water damaged and the metal drywall corners on it are rusted. So it needs work regardless. Anyways, it is just 2 2x12s that stick down like that. The plan is to tear it all out, and push a manufactured beam up into the ceiling. That part is a separate roof (for the original summer kitchen/ sunroom) so there is plenty of room for the support. Also, since we are tearing out the ceiling, we have the option to vault the ceiling in that part of the room or do something neat. The wood rafters up there are super pretty, aged chestnut I think. It throws off my whole kitchen design though. I’m not sure what we’re going to do. I’ll be able to get some pictures once we get a bigger hole in the ceiling. That is a project for when we have a dumpster. The plaster is so heavy that generating all the building waste without a place to put it is a no-go!
Another project on the list, on the side of the stairs that run into the kitchen, there is a wall-banister thing. It really visually separated the stairs from the room and is not necessary. We are going to remove it (sledgehammer anyone!) and put in a standard stair railing. My first instinct was something like this  but I’m starting to think a standard white railing may fit better with the kitchen. I’m not sure why my first thought was iron but I think it has something to do with a black-and –white kitchen. I’m thinking something more traditional would be good for the space.

I need lots of thoughts. Flooring, Ceiling, and Railing. Leave me some comments!
Sarah
-
I am in the process of deciding how to do our current stair well also. It is on the main floor and we want to do railing soon. We have an 18 month old and she knows how to climb the stairs. So we are now worried about her falling off the edge. I know many parents would just say “gate it off!”. We usually don’t allow her to play on/around the stairs so I do not think that is relevant in our case.
Aesthetically, I like the white look better. I also saw where someone had white rails, but wood grained base board and a wood grained hand rail and I thought that looked nice. I don’t like their design choices on the white though with the rails on the outside of the stairs and pairs being level (to each his own though).
I don’t know if you have done it before but I notice the bottom picture you posted shows no support for the last few rails. Unless they are attached directly to a beam in your ceiling that is a no-no (just from research).
I look forward to seeing what you do.


More Kitchen Questions
White or cream. That is the big question. At first I was thinking White is too white, too 90s stark. Now, I’m starting to think that white is, first of all, back in style in a big way, and will be easier to accessorize with. Here are some images from Better Homes and Gardens to illustrate my point.


and for the cream kitchens:


I’m starting to think the cream does not fit with the look I’m going for. I’m going for light, bright, Victorian not french vintage chic. Then again, White scares me. Color seems much more manageable thought I’m definitely doing white subway tile back-splash so maybe white is the way to go.
What do you think? Leave me a comment!
Sarah
-
I vote for cream! I feel like the white is more harsh looking. The cream looks much warmer and more inviting.

Closet Design and Planning
On the second floor of the house, there is a good sized bedroom which will be the master. To the left is a bathroom and to the left of the bathroom is another smaller bedroom. The plan is to make the bathroom into a half bath and a full master bath with jack and jill pocket doors to the master bedroom and this smaller bedroom which will become my Closet and Laundry room! It’s going to be awesome! I’ve started thinking about how to do the closet and I have tons of ideas.
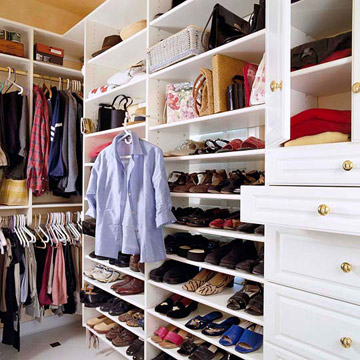
Something like this is quite obtainable though I think it needs some decorative molding at the top to really finish it off. I love the shelves for the shoes. I’m not a big fan of standard shoe-shelves with the angle, they aren’t good for sandals which are obviously a shoe staple!
Similar to this one, my mother’s closet has a shelf all the way around the top of the room and it is fabulous. She says it is the best feature of the house. All the luggage, off season comforters, blankets, extra pillows, all stay dust-free, dry. Another great feature is a peninsula of hanging clothes. It juts out into the room with a full-size mirror on the end. 4 feet long and about 3 feet wide it houses approximately 16 feet of hanging storage. That’s amazing!
There are a few other things I’m looking into. One is a pant hanger. Stefan (my husband!) has a tendency to just drape his pants around instead of putting them up on hangers. I was thinking that perhaps something like this to feed into that habit and make it productive would be a good option.
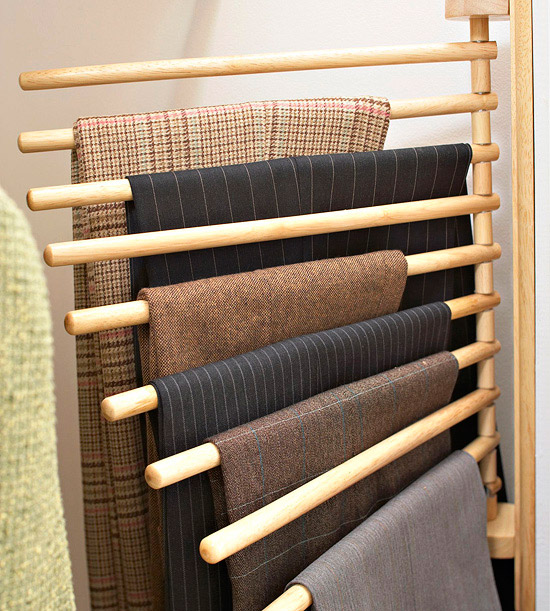
Since this is going to be a laundry room and master closet, I’ve gathered inspiration on functional laundry rooms as well. After reading steam generator iron reviews I decided that’s the iron I need for my laundry room.
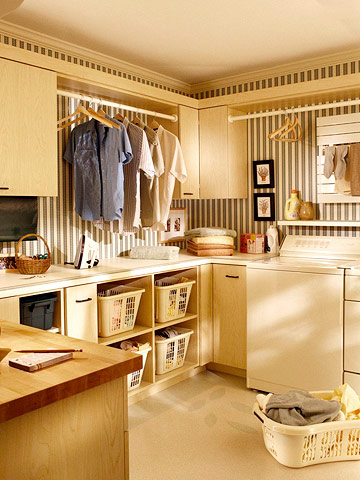
This image spoke to me with the drying space for hanging clothes mimicking my plan for a joint laundry/closet. I love the shelves just the right size for laundry baskets and the stripes on the wall break up the built-ins well. I’m thinking perhaps a tone-on-tone stencil or stripe would be a great option for any exposed walls in the closet. Something to make it romantic enough to be a part of the master suite.
I need to get a scale-sketch done this weekend and start thinking about how to design/make/buy this dream closet, not only that but I also need to start getting in contact with interior designers Hertfordshire to help me plan other areas of my home
Sarah!
P.S. All images from Better Homes and Gardens


Sheila
2/20/2012 | 5:05 pm Permalink
Since I have seen the space I think the traditional white stair railing balsters would go with the large white farmhouse kitchen look you are going for.
I like the black iron ones but it is cold looking as opposed to the white wood warming up the space, especially with your tall ceillings.
Plus more kid friendly since this stairway will be used a lot. Good place to attach kid art work, hang backpacks from, etc.