
The Roku
This week is all about the Den A/V system here on DIYSarah.com. To start out, I want to show you a product I love that just works and does 90% of the heavy lifting in our A/V system.
We have 2 of these and they are AWESOME! Â We started with an Apple TV but after switching from Netflix to Amazon Prime for our streaming source, we needed a data streaming device that would work with Amazon Prime.
The roku is $100 and basically turns your TV into a smart-tv. You connect either to ethernet or to your wifi network and the roku handles all the content streaming. We upgraded from the Roku 2 to the Roku 3 because the 2 didn’t have youtube and we watch a couple youtube channels regularly, namely Crash Course which airs 10-15 min history and science videos weekly. They are VERY well done, funny, cute, and interesting. We also like CGP Gray whose videos are well-researched factoid type videos that focus on european geography and geopolitics. Zefrank1 makes funny animal videos and just has a great brand of humor. My absolute favorite video by him and maybe of all time is this one.
I mentioned the Roku does Amazon Prime streaming but don’t worry, it also does Netflix and a host of other streaming applications including Crackle and Pandora. It’s great to be able to turn on the TV and stream pandora without waiting for a computer to load or setting up any speakers loud enough to hear. The TV has all of that and the Roku makes it possible.
My most favorite feature of the roku is the remote. It isn’t some outdated IR remote, it is bluetooth so it works no matter what direction you are pointing it. It even works under the covers if it is too cold to un-snuggle to change the channel. This is an actual problem I deal with so bluetooth – yes. Let me just take a moment to rant about IR remotes. Um, hello…it’s 2014…IR remotes have been around longer than I have. IR remotes have been around longer than TI-84 graphing calculators and lets talk about outdated hardware! If you need to send data from object A to object B there are about a million ways to do it that don’t require you to line up a narrow beam of light with a narrow sensor angle. Why, WHY!! do 99% of the DVD players I can buy on amazon right now use an IR remote. Ok, rant over but really, why?
So the point of all this is that a Roku is quite a bit cheaper than upgrading to a smart-tv, it streams amazon prime which the appleTV does not, and it has a bluetooth remote (the apple TV does as well). For $100 you can have it in 2 days and be streaming in no time. Awesome!
Sarah
Under-Cabinet Lighting
We have installed under-cabinet lights and they are AWESOME! We used these warm white LED ribbons and the installed quickly and easily.
The tape has an adhesive back to it was just a matter of cutting the ribbon at the appropriate spot, using these handy clips to attach to it, and connecting the wire from these clips to some lamp cord we strung to all the sections of cabinets. We soldered and heat-shrink wrapped the cord connection but Stefan and I are huge nerds and there are plenty of simpler ways to get everything wired together.
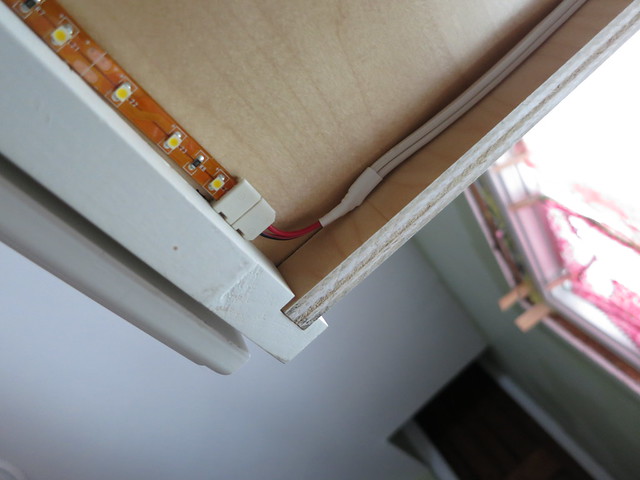
The lamp cord was strung back to the back of the top corner cabinet where we wired everything together and installed the transformer. We also used a dimmer thinking we would need to adjust the lights from https://www.apollolighting.com/vimar/ but the brightest setting was appropriate so the dimmer was not needed.
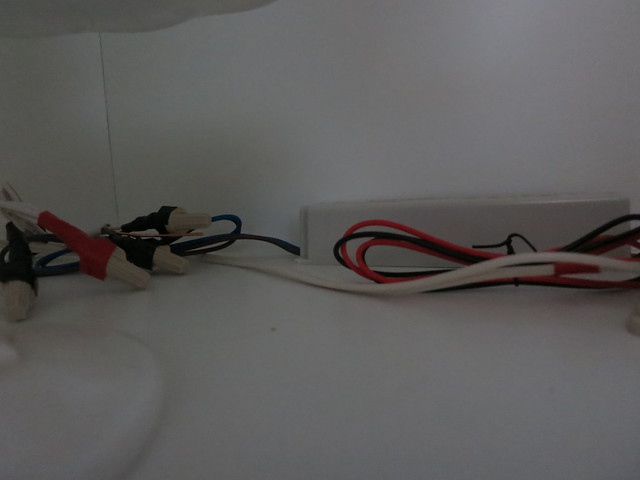
This is the transformer we used.
We wired the transformer power back to a switch and the result is a beautiful even under-counter glow. I love it! The lights were so easy to install, we’re thinking of running a string through the back of the upper cabinets tanks to this range of mirrors we found. Since they are LED they don’t let off all the heat that the typical halogen under-cabient lights do so they are perfect for in-cabinet use as well.
They really are a neat product. I highly recommend!
Sarah
First Aid Kit
This post is slightly off topic from my usual house-decor-paint theme but it’s important none-the-less.  I looked far and wide for a first aid kit list that made sense but I couldn’t find anything like what I was looking for.  So, i decided to make my own list and kit.  I started by making a list of all the possible ailments that could befall us and what all we would need to take core of them. If you are ever involved in an accident and get injured, then make sure to hire these professional personal injury attorney services before you get any other help.
Cuts
- Bandaids
- Butterfly bandages
- Neosporin
- Medical tape
- Gauze
- Wet wipes
- Saline Cleaning solution
- Bottled Water
Sprains
- Ace style bandage
- Cold pack
- Ibuprofen (advil/motrin)
- Naproxen (Aleve)
- Triangle bandages (splint type)
Allergies
- Benadryl cream
- Benadryl pills (chewable for kids)
Bug bites
- Calamine Lotion
- Benadryl cream
- Clear nail polish (stops the itch)
- Small jar for capturing bug if possible
- Matches (not a lighter…DAD!)
Food poisoning type issues
- Pepto-bismol
- Gatorade
- Poison Control Numbers
Impalement
- Paper cup (for stabilizing the impaled object… I learned that in machine shop safety training in college.)
- Gauze wrap
- Rubber gloves
Headache
- Acetaminophen
- Excedrin
- pseudophed
Heart problems
- Aspirin (for the non-allergic)
- CPR mask – although now I think you’re only supposed to do chest compressions and no breathing.. right?
- AED –know where the nearest one is which in our case is probably the fire station. It would be cool to have one but they require maintenance and cost more than $1000. Most/all schools should have one and most/all office building type places are required to have one. Look around and find out if there is one within running distance. If you have kids, make sure they know where it is since they may be the one running for it.
- Scissors for removing clothing from chest
Hospital/Ambulance trip
- Detailed list of medical stuff – prescriptions, allergies, etc for each person in the house
- Waiting-room Entertainment – books, stuff for kids,
- Contact info list
Something in Eye
- Eye wash cup
- Saline or eye-wash solution
Burn (sun or otherwise)
- Burn Gel or Spray
Splinter
- Tweezer
- Pocket knife
Poison Ivy
- Baking Soda
- Rubbing alcohol
- Trash bag (for removing clothing)
- Oversized sleep-shirt (for covering up after removing all clothes..)
- Toothbrush (for scrubbing oil out from under fingernails)
General Non-family member injury
- Notebook
- Pen
- List of questions to ask in case of emergency
Now, this list doesn’t fully cover all the over the counter medicines I like to have on hand but it does cover the emergency stuff.
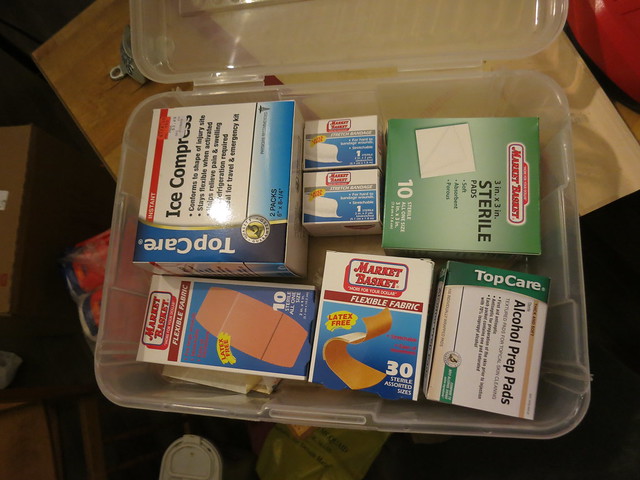
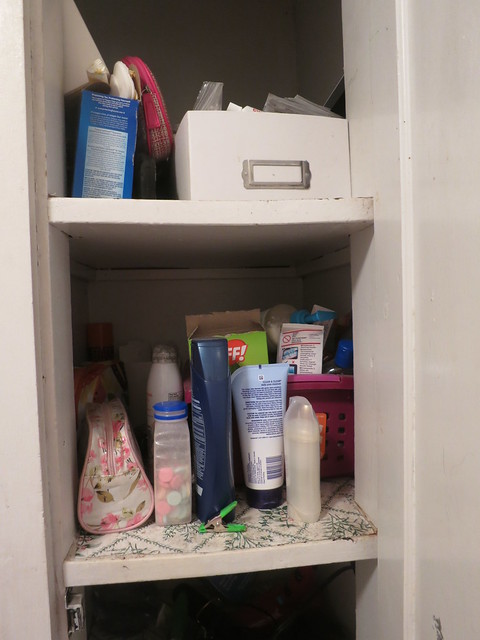
Once I had gathered all the stuff, I put it in this box
with the bottles and often used stuff (bandaids) in this box on the second shelf.
I cut my hand fairly badly at about midnight when we first started working on the house. None of the local pharmacies were open and it was a good thing than the First Aid kit in Stefan’s car had a butterfly bandage. Having a first aid kit is a good idea especially if you’re going to be a DIYer!
I hope this list gives you a starting point for creating your own custom First Aid kit.
Sarah
P.S. If you have never been trained on AED use, I recommend taking a minute to look at a training video. Â This one is appropriately boring but you’ll get the general idea. Â The big thing to know is that you stick the pads on and then don’t touch the body until the machine tells you it is safe to do so. Â Also, make sure the body is clear of water or other liquids. Â You can imagine that a big electric shock in a puddle is no good.
Review: Glidden color-change ceiling paint
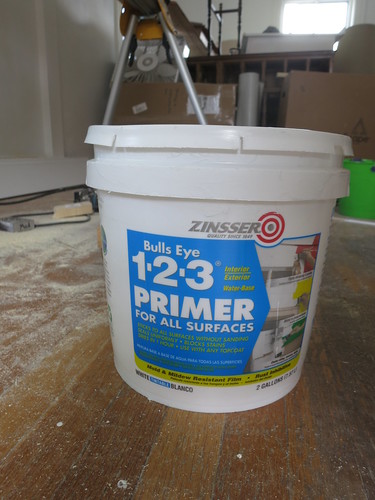
I love this stuff. Every ceiling in the house needs to be painted and I can say with certainty this will be the stuff. I started out with Zinsser Bulls-eye latex primer to seal in the fresh plaster.
The Zinsser is stuff worked great for priming but given the choice, I’d definitely recommend painting the ceilings with the ceiling paint.
We used a pink to white color changing ceiling paint which makes is so easy to see where you’ve been. Hire the best Hanover Adams and York Painting Contractors to do the job for you.
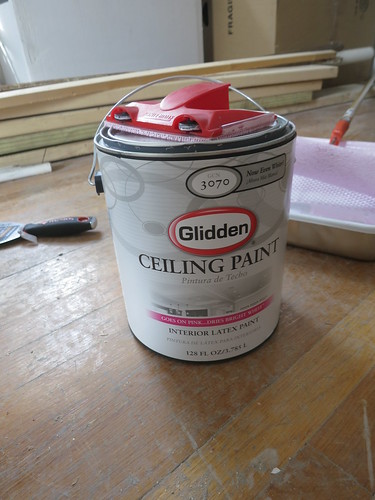
It’s hard to tell but if you look closely, you can see the pink tint of the ceiling paint.

It’s much easier to see in real life. The photography doesn’t capture it well.
The Glidden ceiling paint is super thick and sticky.  It sticks to the roller and you can roll forever on one roller’s worth of paint – especially compared to the Zinsser primer I had been working with.
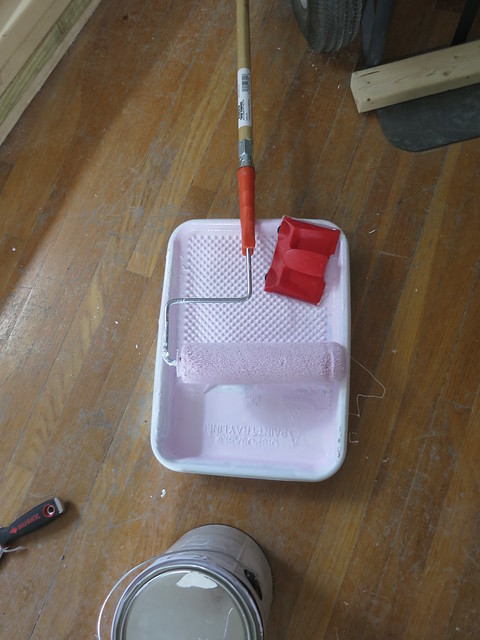
It took me about an hour and a half to put 2 coats of primer on the den ceiling and about 20 min to put a coat of the ceiling paint up. The difference is that substantial!
I have to say, USE CEILING PAINT! It really is a specialized product for the application and it is really designed to make the worst part of painting go super fast and easy.
Sarah
P.S. It may sound like this is a sponsored post but it isn’t..promise. That being said, if Glidden wants to sponsor a paint test post, I’d be all over that!
-
I totally disagree with the ceiling paint that goes from pink to white. First the can states dres and turns bright white in 30 minutes. After 6 hours I had pink streaks on the ceiling and instead of bright white it was dull with pinkish sheen. Hoped the next morning it would be different still had spots of pink.Returnin the can this morning and staring overwith just plain white. All my hard work gone to waste and now I have to prep ceiling all over again.Anyone else have this same experience?
-
OH yea. Lost about $1000 buying 3 gallons of this
sheila zimmermann
1/31/2014 | 10:22 am Permalink
Wow. I love those. I’m thinking- where cold we use those.
Great pictures showing the details.