
Dining Room Curtains
I have finally sewn, ironed, installed, and hemmed the curtains for the Dining Room. I bought this fabric nearly 2 years ago and I LOVE it. It is a nice green and tan floral with hints of lilac and it has a nice drapery weight and enough of the linen texture to be current. It’s Lauren by Ralph Lauren and I purchased it at Joann Fabric in the discount area. I even sent my mother looking for it at her Joann Fabric in Houston. Low and behold it eventually found its way to my super discount fabric store nearby and I now have just a ton of this fabric. I’ve covered the seats of the dining room chairs in the fabric and I’m thinking of making a couple of pouf ottomans as well. Check out more about these lovely and elegant Beach Curtains.
The curtains are fully lined so I pinned both sides of a 3 yard length of fabric. I wanted the fabric to be wider than the lining so that the lining didn’t show from the front. Maneuvering the fabric was difficult but plenty of pins made the project manageable.

After turning the curtains right side out, I did a lot of ironing. I added a rod-pocket to the top and folded all the curtains neatly until the rods were up and I was ready to hang them.

I still need to figure out the best way to tie them back so they look nice but still let in light. I have the one pulled back in the photos because it hangs right over the heater vent when it is down strait.
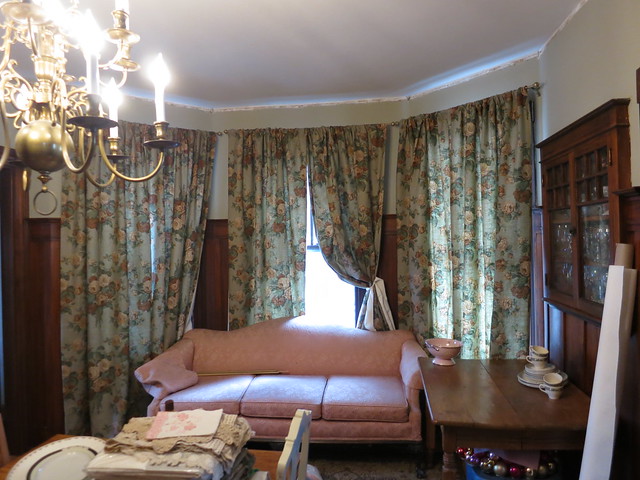
All in all the curtains are a success. They do a good job of insulating the windows and I’m glad I added the lining. Those old windows are drafty and because of the beautiful molding in this room, the windows aren’t going anywhere.
I’m thinking some tan satin tie-backs are just the thing for these windows but I’m open to suggestions. Tassels? Metal hooks?
Sarah
Vintage Chandeliers are up!
We have light!!!!
It’s amazing how much you under-appreciate overhead light until you don’t have it anymore. I can’t even imagine pre-electricity. How annoying would that be!!
It was the day of the big Christmas Party, the weekend before Christmas. Sarah was cleaning all morning and then baking…lots and lots of baking. Those are perhaps normal things you would do before a party – clean and bake. But what about Stefan, surely he was helping? Nope..Stefan had an even more important job to do – finish the electric so we don’t freak people out with our exposed wiring. Yes, it is the day of the party and Stefan is re-wiring switch boxes, running around putting switch covers and outlet covers up, and oh yeah, hanging lights so that, you know, people can see each other!
We sure know how to kick ourselves into gear.

Just the week before, I purchased this chandelier at a Salvation Army for $7.99. I figured for $8 we could use it as a temporary light in the piano room but after we got it installed, I have to say I like it!
It would have originally called for hurricanes and bowl shades something like this one:

But Stefan had the great idea to pop some 4″ globe bulbs into it since we didn’t have the shades and I Love the look. The 4″ bulbs only come in 60 Watts which is a bit bright for an exposed bulb but we installed a dimmer and it looks great.
Adding 4″ bulbs to a vintage fixture is my new go-to way to modernize. I’m a big fan. The only downside is that they don’t come in CFL or LED so they are power sucking monsters but I’m hoping that in time I’ll be able to find them.
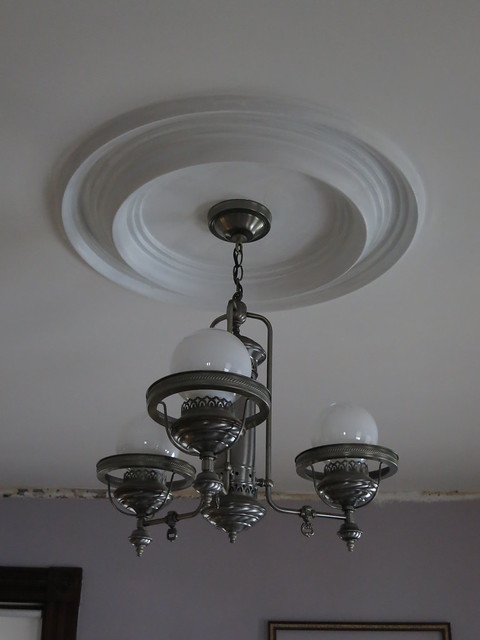
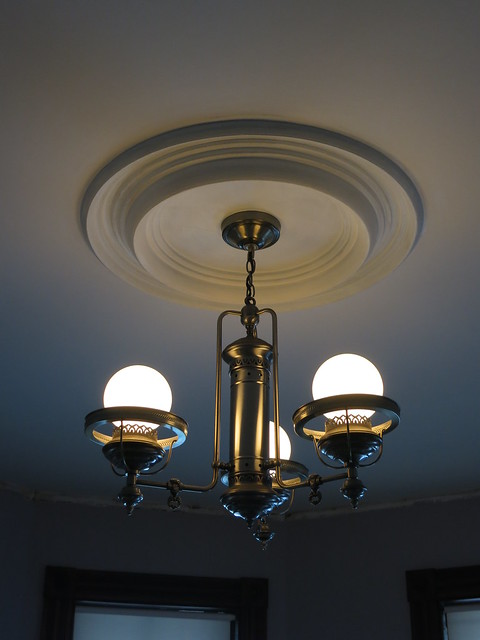
In the dining room, we installed a typical colonial style chandelier. It’s a 12 light with the little candles.
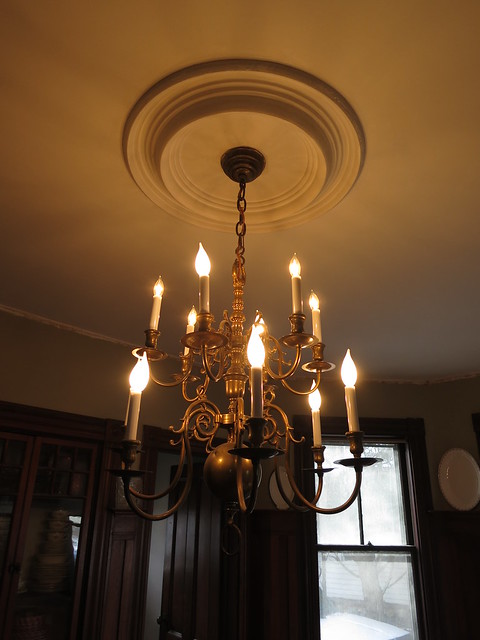
It was left in the house by our neighbors when they thought they were buying the house. Long story but we basically acquired this beautiful brass chandelier and it looks great in the room.
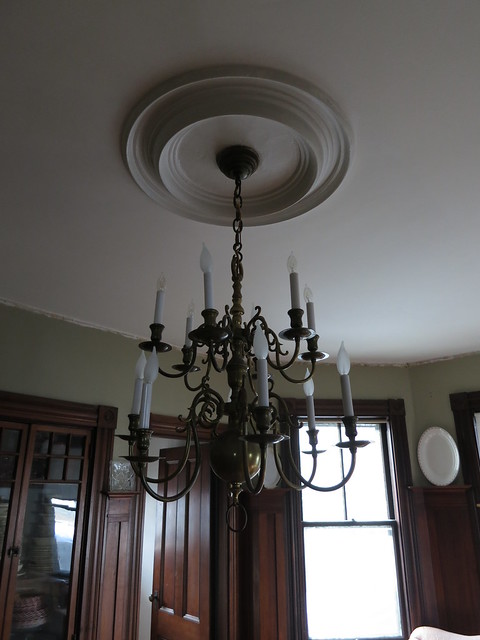
It was missing all the sleeves that go over the electric candle part and I found them to be cheapest at Lowes but once we put them up, they were a little transparent. I just cut some paper to size, formed it into a tube and slid it inside the covers before putting them up and that did the trick.
Some candelabra bulbs, a wipe down with a swiffer, and she was good to go. I’m hoping to add a dimmer to this switch as well. 12 bulbs is a bit bright!
Now we just need to install the fixture we’ve picked out for the front entry and we’ll be good to go on the first floor!
Sarah
-
25 Tips on How to Increase Property Value - Choice Home Warranty
[…] value while giving your living space some character with elements other than furniture. Both DIY Sarah and Ruffles and Truffles have perfect examples of how chandeliers can transform a common […]
Trackbacks & Pingbacks
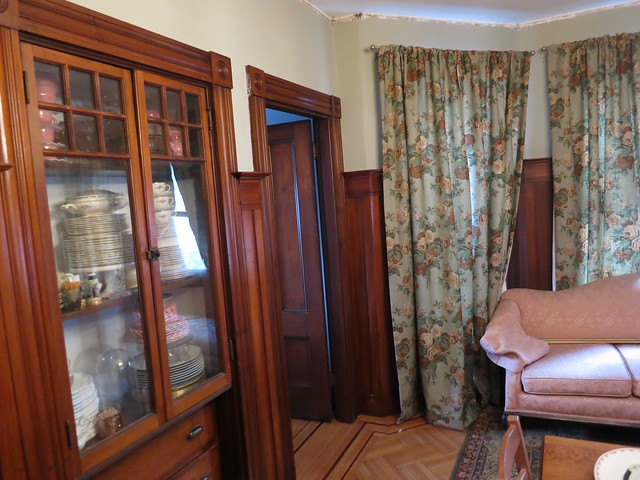
Filling up the China Built-in
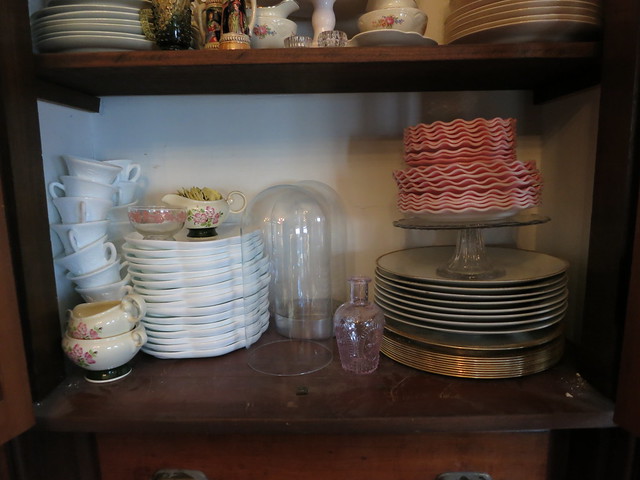
After the Christmas decorating rush, I took some time to go through some more of the many many bins in the basement. Most were filled with china of one variety or another. I’ve unpacked most of it and have started arranging it in my china cabinet built-in in the dining room.
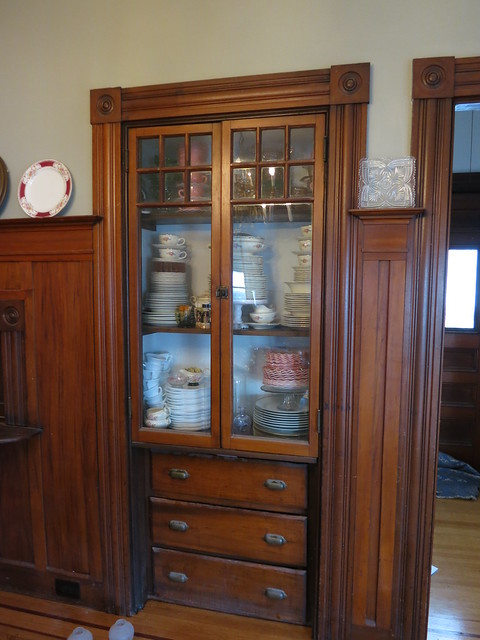
This set of China I purchased for myself as a wedding present of sorts. It’s Homer Laughlin and not super rare or valuable but I love the scalloped plates, the cream background, and the gold trim. Very sweet and girly.
I got a service for 12 give or take with many fewer cups and saucers which is really a blessing in disguise. I’ve also got a toureen with a broken handle, a gravy boat, cream and sugar, soup bowls, dessert bowls, dessert plates, salad plates, and dinner plates. It’s a huge set and I’m so glad I picked it up when I did.
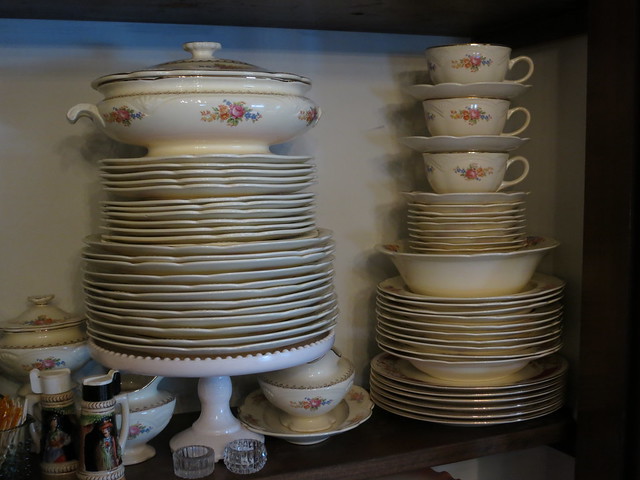
I’ve got the plates propped up on a cake stand which is a great trick for filling up a china cabinet. It gave me more room on the shelf for the little stuff.
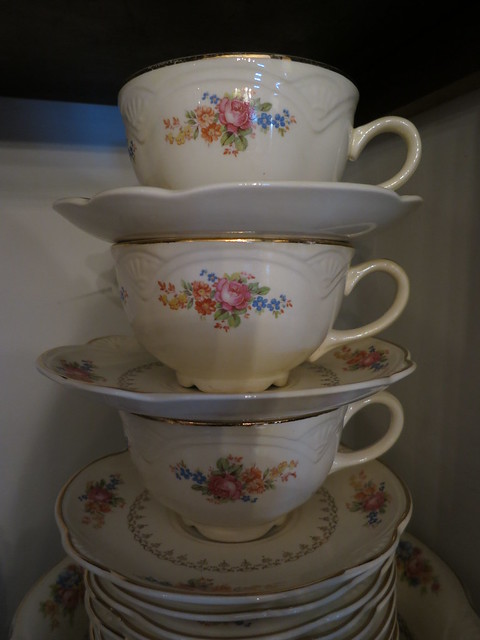
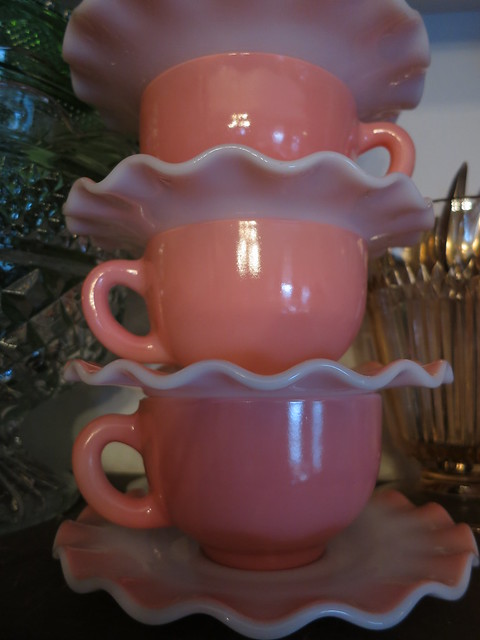
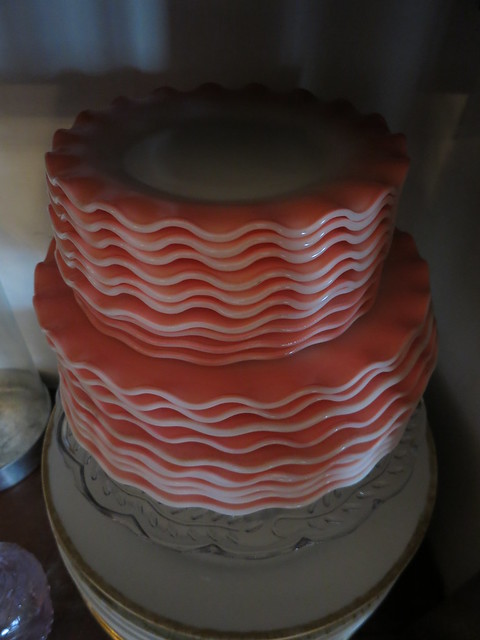
The other set of china that I’m super proud of is my pink ruffle. I picked up my first set of 4 at a local antique place. I fell in love and couldn’t leave without it thought I believe it was super cheap – like $12 for a service for 4. The bowls had been stolen so she had it discounted. I bought the second set in Houston somewhere and when I saw it, I again wasn’t leaving without it. I’ll be collecting pink ruffles forever I’m sure and I’ve picked up a few single pieces here and there when I see them. It’s just so striking and adorable. I love it! It’s not marked but the research I’ve done indicates it is from the 1940s.
The display still has a ways to go but talking about the display cabinet wouldn’t be complete without mentioning the milk glass snack sets.
Yes, that is a lot of snack sets and no, that isn’t all of them… They were my grandmothers. I have 40 something sets. They have been moved across the country and back several times and whenever I see them I just think to myself that I am just as crazy as Gram was and I couldn’t be prouder. When she died and we were cleaning out her stuff, it was like Mary Poppin’s carpet bag. You just couldn’t understand how so much stuff came from such a small place! The same is true with me I think. I’m really good at storing my things and knowing where I’ve stashed them.
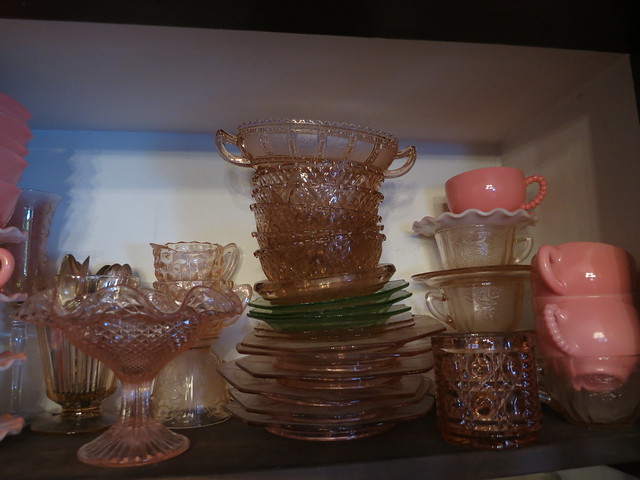
The top shelf in my china cabinet is currently filled with pink depression glass. I’ve got a small collection going but it isn’t displaying as well as I would like. I need to work on it some more and see what I can do.
The only bins filled with breakable things left in the basement are filled with “Koala and Nonny Figurines” (Nonny was my great-grandmother) and my punch bowl and cups. Just a bit more unpacking to go and then we’re going to need to figure out what to do with my book collection….
Sarah
-
Are the walls in your dining room painted a light green? The back of your china built in needs a color. You might think about painting it that light green or even another color. Your china will look so much better.
I’m so happy for you. Can’t wait to see it. Enjoy!
-
Agreed. I used up all the green paint for the dining room so I need to get another can before I can paint the china cabinet. I half considered covering some posterboard with fabric and sticking them in. Maybe a nice stripe? Then again, I have so much china it may just be too much.
-
-
Open post – Gilded Age Edition. - Victoria Elizabeth Barnes
[…] Ireland.  The rest of the photos are a mix of giant Victorian stuff, thus I approve. Thanks to DIY Sarah for the […]
Trackbacks & Pingbacks
Bar Cabinet and Champagne Cocktails
Since it is New Year’s Eve, I’ve decided to show you our liquor cabinet and give you some ideas for yummy champagne cocktails.
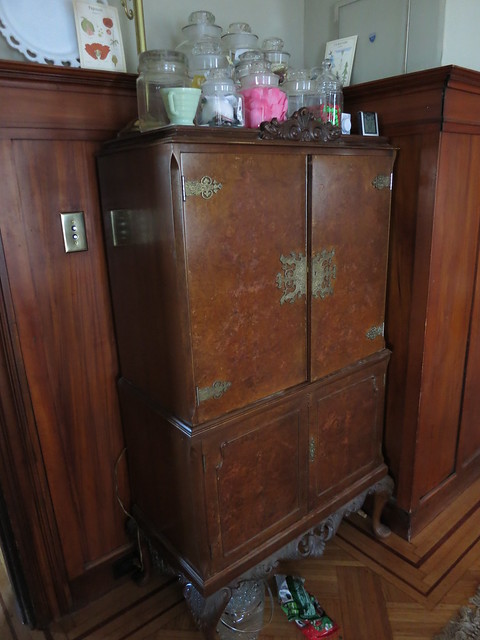
I believe I’ve shown you this cabinet before here. We purchased it for $100 at an estate sale and I’m so glad we did. Now that the floors are refinished I can finally start arranging the furniture in the house, can’t wait to get interior design services! Yay furniture.
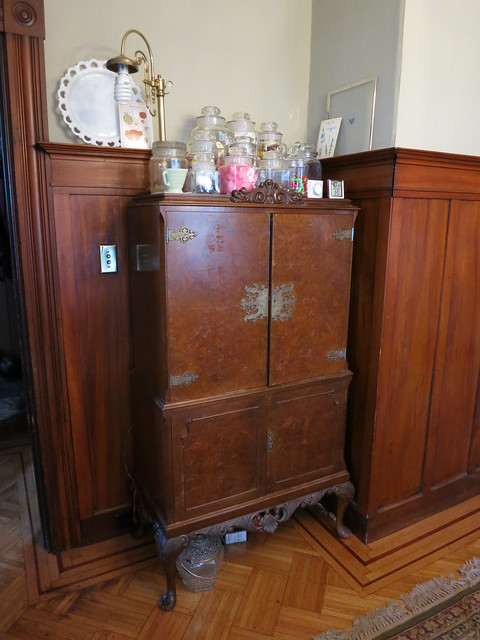
The bar cabinet fits perfectly in this nook in the dining room. We have a lamp on it at the moment but I don’t think it will be there permanently. It was a last minute addition to hang the chandelier in the room so the lamp was a practical addition to the room.
On top of the cabinet, I have my collection of jars. They aren’t filled or arranged yet but they will fill up with time I’m sure. I’d like to put my punch bowl up here and put the jars in the Den but the den isn’t quite to that point yet and the punch bowl is all packed up still so jars it is.
The outside of the cabinet is this beautiful burl veneer.
And the inside is a gorgeous maple.

Lots of mirrors and frankly, lots of booze. We are still drinking the leftovers from our wedding – 2 years later! I’d like to get to the point where the wine can hang out on this bottom shelf but for now…it’s still filled with more liquor –
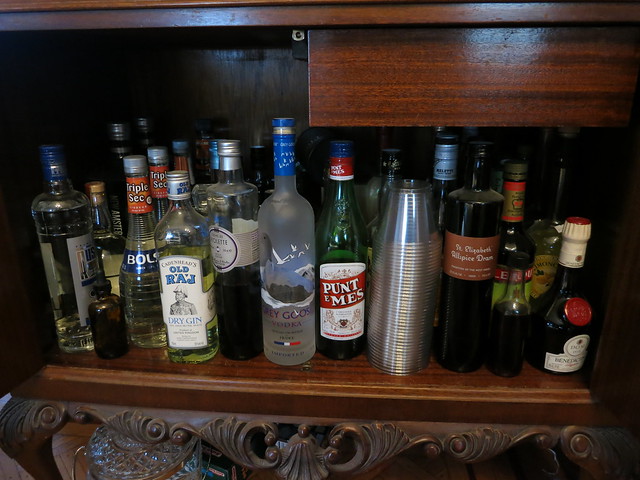

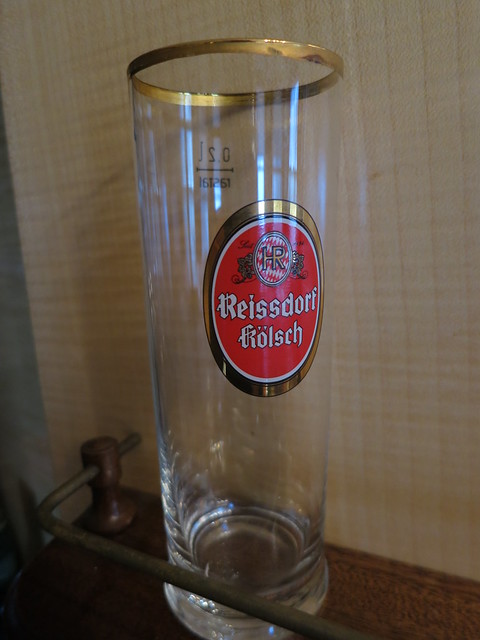
This odd-looking contraption is called a Chandelier and the glasses are called Stagen which is german for Pipe. When Stefan and I traveled to germany, we went out into the suburbs of Köln (Cologne) to visit this Brauhaus. It was our favorite beer of the trip. Kölsh style beers are always served in these little 0.2 L glasses and each one typically costs 1 Euro. They mark on your coaster how many you’ve had and the waiter comes around with the chandeliers filled with glasses to serve you. We served Riesdorf Kölsh at the wedding and ordered the glasses and this chandelier. I’d like to display the chandelier better. It is a great centerpiece with flowers in each of the little glasses but for now, it is in the cabinet.
Stagen –
I mentioned Champagne Cocktails. I love me some Champagne Cocktails. Lets start with a Sarah Specialty – the Poinsettia. We served these as the signature drink at our wedding.
Sarah’s Poinsettia
1oz Cranberry Juice
1oz Triple Sec
1.5oz Good Quality Vodka (Optional)
Fill glass with Champagne
Squeeze of Lime
Garnish with Orange Twist
My second favorite Champagne cocktail is a punch. List most punches, this one involves a lot of throwing things in the bowl until it tastes good
Christmas Champagne Punch
1 bottle Champagne
1 cup Cranberry Juice
1 litre fruit flavored seltzer or Raspberry Ginger Ale
1/2 contaner of frozen strawberries in sugar
Add fresh cranberries and Orange slices for garnish
top with an ice block frozen in a jello mold
For our Christmas party, I found this great silicone snowflake mold and made some awesome ice cubes. I tossed some frozen strawberries and cranberries in the mold, topped with water, and threw it either in the freezer or outside until frozen. Super cute and easy!

If Gin is your Liquor of choice, try a French 75
French 75
1.5 oz Gin
1 oz Contreau
1 oz lime juice
Champagne
lime garnish
This is basically alcohol with more alcohol as a mixer…dangerous and delicious.
I hope you all have a festive, safe, and happy new year!
Sarah
Trackbacks & Pingbacks
[…] couple weeks ago, I posted about the new curtains. I recently picked up some cream satin ribbon and used that to tie back the […]